
When Brad and I visited some friends in Clemson, SC earlier this year, we had dinner at a great little Italian restaurant. Nothing fancy, just cheap, good Italian food. The best part of the meal were the baskets of garlic knots they brought out to the table...lovely little bite-sized knots of french bread, dripping with garlic sauce. I won't lie...we ate an embarrassing amount of them. Tonight I set out to recreate them.
I intended to use this recipe, but it didn't occur to me until too late that I didn't have yeast on hand since we just moved into our house. So instead I ran to the store and bought a tube of Pillsbury french bread dough. I know, I know, that's not cool, but it worked. But if you find yourself in a similar bind, or you aren't a good bread dough maker, or you just want a really easy side dish, try this recipe. They were to die for, and once again, we ate an embarrassing amount.
Easy Garlic Knots
1 tube Pillsbury refrigerated french bread dough
1 large garlic clove
1/4 tsp sea salt
1/4 cup olive oil or melted butter
Heat oven to 375.
Open dough, and cut into 12 equal pieces. Roll each piece into a rope about 6 inches long, and tie in a simple knot. Place on a baking sheet while the oven preheats.
Peel and chop the garlic clove. Using a mortar and pestle, or the flat side of a chef's knife, mash the garlic and salt together until it forms a paste. Stir it into the olive oil or melted butter. Using a pastry brush, liberally brush the garlic mixture onto the knots. Bake 10 to 12 minutes, then remove from oven and baste again with garlic mixture. Return to oven for a few more minutes, until golden brown.
If desired, serve with remaining garlic sauce for dipping.
Showing posts with label sides. Show all posts
Showing posts with label sides. Show all posts
Wednesday, April 15, 2009
Monday, September 8, 2008
A first
If you ask me which foods I don't like, my answer is always squash and sweet potatoes. I've always been a very open-minded eater, even since childhood, but a love of squash and sweet potatoes has eluded me. I've made some progress over the years, and in adulthood I learned to love zucchini, summer squash, pumpkin, and tempura slices of kabocha, but that's about it. Every year at Thanksgiving, I give sweet potatoes another try, but I have never enjoyed them. It's frustrating, because sweet potatoes are packed with good-for-you stuff, and are super cheap, and easy to prepare.
Now, though, I am really determined to learn to love sweet potatoes. My parents love them just roasted in the oven, eaten piping hot with either butter and salt, or butter and brown sugar. I figure either of those ways is too "in your face" for hater like me, so I figured I would try to factor them in supporting roles in dishes. Today I bought one and roasted it in the oven, planning to cube it and add it to my burrito. I got sidetracked with the other dinner prep, however, and forgot about it until we had already finished eating. Woops. I turned to some friends online, one of whom gave me a list of ideas for cooked sweet potatoes. I opted for a slight variation on one of her ideas, and pureed the sweet potato with my immersion blender, stirred in some maple syrup and pumpkin pie spice, then quickly toasted some chopped pecans, and stirred them in.
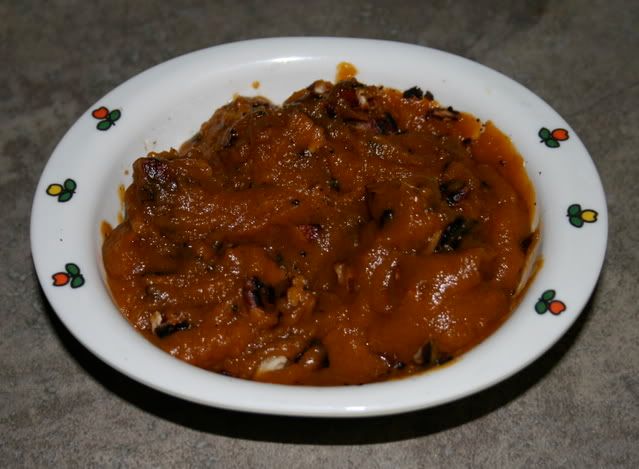
And you know what? It was actually really good! This is a huge first for me: enjoying a sweet potato! It wasn't exactly healthy, what with the maple syrup, but hey...it's a start!
Pinto bean burritos

What a satisfying dinner tonight! I have really been missing fresh foods, so tonight's dinner was particularly enjoyable. I'm so glad to have power again! Earlier today I mixed up a quick batch of pico de gallo, and for lunch I had a flour tortilla wrapped around a big ol' scoop of pico de gallo.
The burritos this evening were simple...just some canned pinto beans, drained, rinsed, and heated with a little chili powder and cumin; corn browned with chili powder; as well as sauteed onions, pico de gallo, and avocado, all wrapped up in a big flour tortilla.

On the side, I had one of my favorite treats: an avocado half, lightly sprinkled with salt, and filled with a bunch of fresh pico de gallo. Just dig in with a spoon, and eat it up. Delicious!

Wednesday, July 30, 2008
Chipotle Barbecue Bean and Corn Salad
I was so inspired by this recipe on Food Blogga last night, that I had to switch up my menu and make it for tonight's dinner. I mean, look at Food Blogga's pictures! I was drooling from the first glance. So I stopped at the store on the way home, picked up all the ingredients, and made it almost as soon as I walked in the door from work. I wanted to make sure it had time to chill for a bit before dinner, as the recipe states that it tastes best after a few hours.
It's so delicious! Tangy, smokey and spicy. I love it! We've really been enjoying the Black-eyed Pea Salad lately (which I've now taken to making with garbanzo beans and edamame instead of black-eyed peas), so I'm thrilled to have another chilled bean salad to add to my repertoire.
I made a few minor adaptations to the recipe: I used 1 whole red onion instead of 2 green onions, because I'm a red onion fanatic; I omitted the red bell pepper, because bell peppers are crazy expensive these days; and I added some diced avocado. Oh, and I just realized that I omitted the oregano because I was in a hurry, and just didn't notice it. Woops.
This is great just eaten plain with a fork as a main dish, or scooped up with chips as a dip, or served as a side dish. You really can't go wrong with this. And it's vegan! Woohoo!
Thank you, thank you, Food Blogga, for an amazing recipe! It's guaranteed to become a favorite in our home.
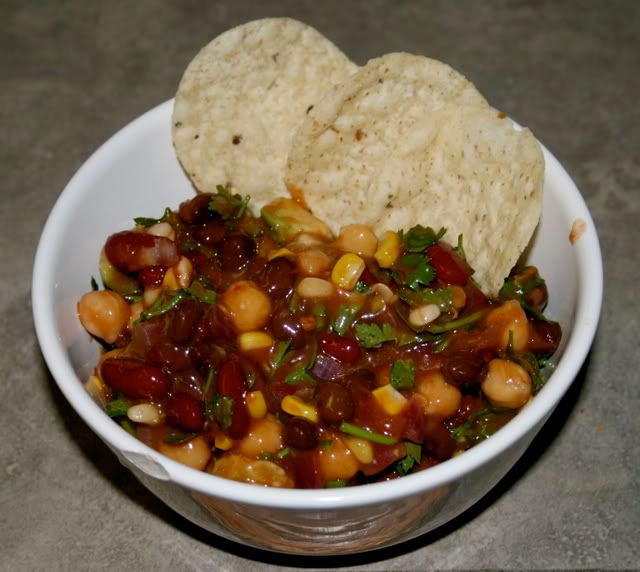
Chipotle Barbecue Bean and Corn Salad
Makes 4-6 servings
Sauce:
1 cup ketchup
1/4 cup light brown sugar
1 tablespoon Dijon mustard
1 teaspoon Tabasco sauce
2 teaspoons apple cider vinegar
3-4 chipotle peppers in adobo sauce, finely chopped, plus 1-2 tablespoons of adobo sauce
Salad:
1 teaspoon olive oil
1 red onion, coarsely chopped
2 ears sweet corn, kernels removed from the cob
1 (14.5 oz) can of black beans, rinsed
1 (14.5 oz) can of red kidney beans, rinsed
1 (14.5 oz) can of chick peas, rinsed
2 tablespoons finely chopped fresh cilantro
1 tablespoon finely chopped fresh oregano
To make the sauce, whisk together all ingredients in a medium bowl, and set aside.
To make the salad, heat olive in a large skillet over medium heat. Add onion and corn kernels. Saute until lightly browned, about 3-4 minutes. Remove from heat, and add to a large bowl. Add rinsed beans, and sauce; stir until well combined. Gently stir in the fresh herbs. Adjust seasonings if necessary. Serve at room temperature or slightly chilled, though it tastes better if allowed to rest for a couple of hours.
Saturday, July 5, 2008
4th of July food
We've had a whole weekend of 4th of July celebrating! Thursday we bought fireworks for the kids, and had an absolute blast firing them off our back porch. I haven't done fireworks since I was 15, and we all had SO much fun! Friday we went over to my mother-in-law's house for the afternoon, then late that evening we set off the rest of our fireworks. We found out that they're illegal in our city (although we're not sure if we are within city limits or not), but you couldn't tell it from the rockets' red glare all over our neighborhood. I couldn't believe how many people were doing fireworks -- and huge ones, like professional display quality. I had no idea you could even buy those! We got one really nice one for free because an employee was tossing it to someone else when we were shopping, and she aimed badly and it hit Brad instead. She felt bad, so she said we could have it for free. Ok! It shot off 36 incredible exploding, spinning fireworks. So cool! Our whole neighborhood was shrouded in smoke from the collective fireworks displays by the time we finally went to bed. Crazy, but oh, so much fun!
Today we're going to Brad's aunt and uncle's house for a 4th of July BBQ pool party, which I'm sure will be equally as much fun. I made several goodies to bring along.
Another batch of sorbet, this time adding some lime juice to the pineapple-orange-ginger mixture. Yum!
And this big bowl of vegan potato salad, using a horseradish vinagrette instead of mayonnaise. Oh, baby!
And a big fruit pizza, veganized so I can eat it, too. Can't wait!


And we're off! See you tomorrow!
Today we're going to Brad's aunt and uncle's house for a 4th of July BBQ pool party, which I'm sure will be equally as much fun. I made several goodies to bring along.
Another batch of sorbet, this time adding some lime juice to the pineapple-orange-ginger mixture. Yum!
And this big bowl of vegan potato salad, using a horseradish vinagrette instead of mayonnaise. Oh, baby!

And a big fruit pizza, veganized so I can eat it, too. Can't wait!


And we're off! See you tomorrow!
Monday, June 16, 2008
Monday dinner
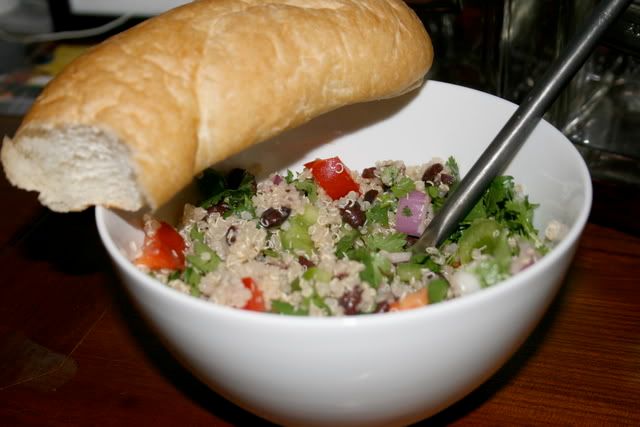
Our weekly menu plan got shaken up somewhat today, since our new puppy Ringo was getting neutered today, and Brad couldn't make it all the way out to Whole Foods. So I did some swapping of days, and tonight we had quinoa salad and French bread for dinner. I made this salad a few months ago, and Brad recently requested that I make it again. I hate repeating recipes too often, because I get bored when I do, but this is one worth repeating! It's light, fresh and delicious. And filling! Quinoa is awesome in that regard, and a little goes a long way, not just in regards to serving size, but also in regards to how much it yields when you cook quinoa. Two cups of dry quinoa ballooned to about 8 cups of cooked. Wow! So I only made half of it into salad, and set the rest aside to have for breakfast and snacks. Perfect!
Click here for the recipe I posted earlier this year.
Click here for the recipe I posted earlier this year.

Sunday, May 25, 2008
Baked Beans
Back in college when I moved into my first apartment, I tried making baked beans from scratch, and failed miserably. I'd never cooked dry beans before, so when the directions said things like "add more liquid if the beans get too dry", I had no idea what "too dry" meant. The beans were awful. These days, when I wanted baked beans, I make them the shortcut way -- by starting with a can or pork and beans, and doctoring them up with a always varying mix of things like ketchup, mustard, molasses, maple syrup, brown sugar, and so forth. I don't use a recipe, I just go by taste with what I have on hand.
Being that it's been 12 years since I tried making baked beans from scratch, I figured it's about time I gave it another shot. I pretty much followed my usual ingredients, but started with dry beans. I didn't expect them to be that much better than my shortcut beans, but they were. The longer cooking time gave the flavors that much more time to soak in and deepen. Yum!
I don't know if I'd make them this way all the time, but I think they'll be an "every once in awhile" treat. I'm glad I made them today!
The quantities below are all rough approximations. I added ingredients all throughout the cooking time until I got them exactly how I wanted them at the end.
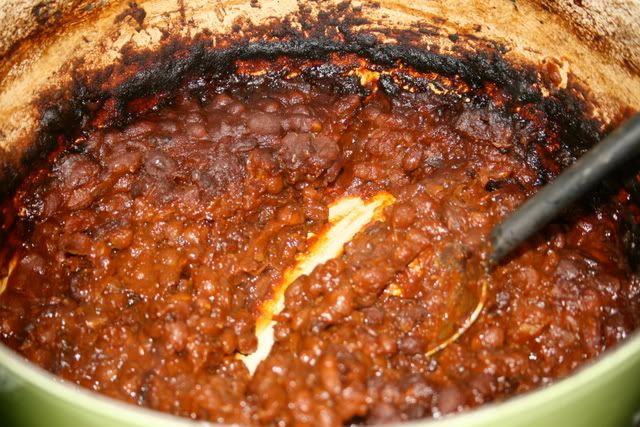
Baked Beans
1 lb dry navy beans
water, to cover
1 cup ketchup
1/2 cup molasses
2 Tbsp dry mustard
1/4 cup brown sugar
1 tsp salt
1 medium yellow onion, diced
6 oz bacon, roughly chopped
Place beans in a large pot, and add enough water to cover by several inches. Bring to a boil over high heat, then reduce heat and simmer for one hour.
Preheat oven to 350.
Drain beans, reserving cooking liquid. Add ketcup, molasses, mustard, brown sugar and salt. Stir to combine. The sauce ingredients will mostly sink to the bottom of the pot, but that's ok. Taste and adjust ingredients to suit your preferences. Stir in onions and bacon. Cover and bake 3 to 4 hours, adding more of the cooking liquid if the beans begin to dry up, until beans are tender.

Tuesday, May 13, 2008
Cornbread Pudding
Brad's mom made this cornbread pudding when my parents came to visit, and we all went nuts for it. It's a really simple comfort food, and totally hits the spot.
I served it tonight alongside some spicy broiled tempeh (this recipe, but broiled instead of grilled) and our favorite green salad with corn, hard-boiled egg and Coco's dressing. Yum! Great dinner, and quick to throw together, which I appreciate because I'm not feeling great today.
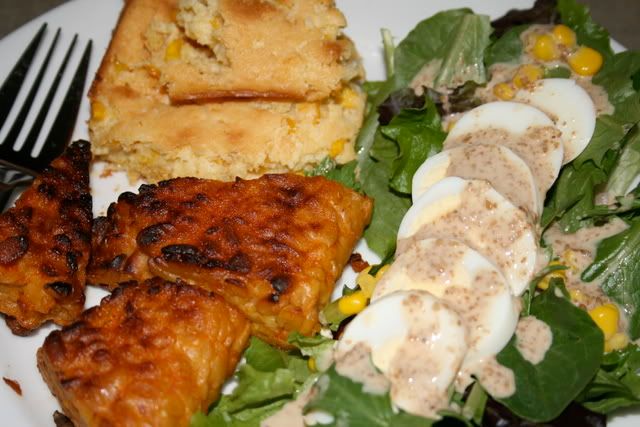
Cornbread Pudding
1 15-oz can whole kernel corn, drained
1 15-oz can cream style corn
1 cup sour cream (I used dairy-free)
1 8.5-oz corn muffin mix (I used the ubiquitous Jiffy)
1/2 cup vegetable oil
Preheat oven to 350. Grease a 9 x 9 inch baking pan. Combine all ingredients, pour into pan, and bake for 45 to 50 minutes.
Wednesday, May 7, 2008
Pesto Pasta Salad
At my favorite pizza place in Seattle, Pagliacci, they make not only the best pizza I've ever had, but also this amazing creamy pesto pasta salad with peas and artichoke hearts. Tonight I attempted to recreate it at home.
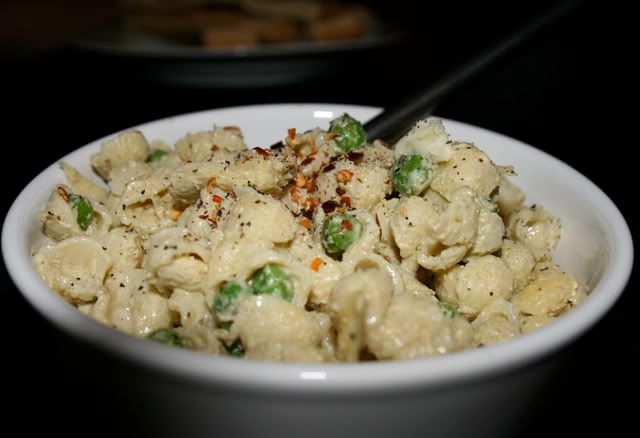
I wanted a lighter version of a creamy pesto sauce, given that there's already so much oil and nuts in pesto, plus I didn't want to use any dairy products, so instead of mayonnaise, I used tofu. It's the first time I've used tofu in that capacity, and I was thrilled with how great it worked! I put about a half cup of prepared pesto (yes, I was lazy) in my food processor, and about 1/3 of a block of tofu, then whirled it all together. Easy peasy!
Creamy Pesto Pasta Salad
1 lb small pasta shells
1/2 cup prepared pesto
1/3 block tofu
1/2 cup frozen peas
1 can quartered artichoke hearts, drained
Cook pasta, drain, and rinse with cold water to cool.
While pasta is cooking, place pesto and tofu in a food processor, and process until smooth and creamy.
Toss pasta with pesto sauce, peas and artichoke hearts. Chill at least 2 hours before serving.
Monday, April 21, 2008
Cinnamon Applesauce
Tonight we're having pork chops, and it just doesn't seem right to have them without applesauce. My girls absolutely love fresh applesauce, and so do I, so I cooked up a quick batch this evening to have with dinner. It's so quick and easy to make, and tastes so much better than anything you can get at the store. I like to add a healthy amount of cinnamon when I make it, and a fair amount of sugar (I like mine sweet, what can I say?). I wish I had thought about it beforehand, and I would have tried using blue agave nectar, but it completely slipped my mind. Oh well, next time, right?
On that note, I bought the blue agave nectar awhile back, and haven't used it yet, because I just don't know what to do with it. Any suggestions? I'm afraid to substitute it for sugar in baking, in case it doesn't turn out, but if anyone has tried and true uses for it, I'd love to hear them!
Last time I made applesauce, it was really smooth, but tonight I wanted it to be chunkier, so I held back a couple apples while the rest of the applesauce cooked. Once it was all cooked down and smooth, I diced the remaining apples and added them to the sauce, cooking just until they were tender. Perfect!
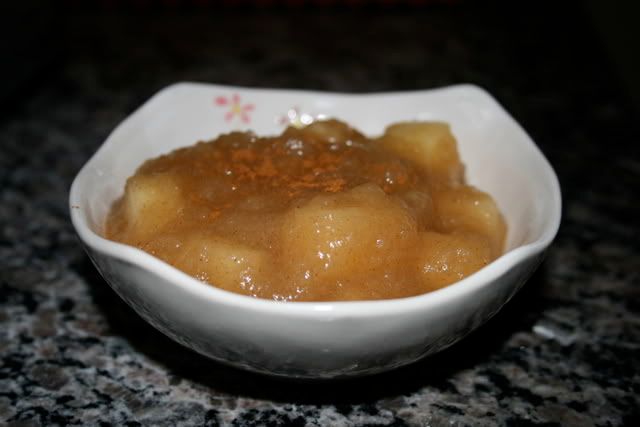
Fresh Cinnamon Applesauce
6 Granny Smith apples
1/4 cup water
1/4 to 1/2 cup sugar (brown or white)
1 tsp cinnamon
Peel and core the apples, then cut into chunks. Place in a large saucepan over medium-low heat. Add water. Cover and simmer, stirring occasionally, for 30-45 minutes, or until apples cook down and soften. Add sugar and cinnamon to taste. Serve warm or chilled..
Blue Cheese Grits
I had never eaten grits before I met Brad. You know that scene from My Cousin Vinnie? Where they're in the diner and he's so trepidatious about trying grits for the first time? Yep, that was me. I mean, I figured they must be good because lots of people like them, but I just didn't know for sure. When we were younger, my mom made couscous for a family we had over for dinner, and their kids refused to eat it until their mom told them it was like grits. After that, they couldn't get enough. So given that I love couscous, I figured it stood to reason that I'd like grits, as well.
Brad cooked them for me one morning for breakfast, and I was instantly hooked! They're the perfect side dish for breakfast or dinner, and they're even great for a filling snack.
Making them this way, with blue cheese, is one of our favorite side dishes. It's so easy to make, and it goes particularly well with pork.
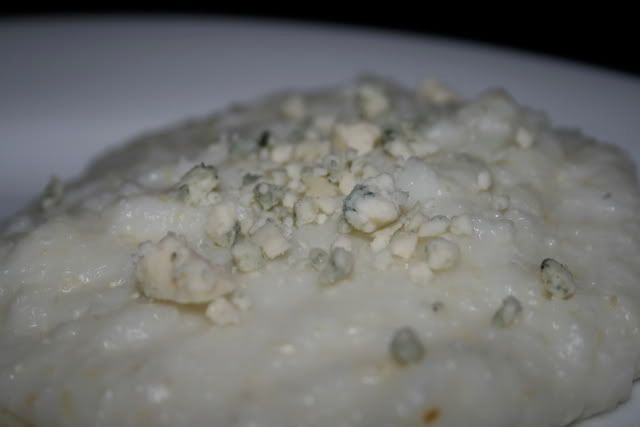
Blue Cheese Grits
3 1/2 cups water
3/4 cups grits
1/4 tsp salt
1/4 cup blue cheese
Bring water to a boil in a large saucepan. Slowly whisk in grits when water is boiling rapidly. Reduce heat to low, cover and simmer as directed on the grits package, stirring occasionally. Stir in blue cheese when grits are done. Serve hot.
Saturday, April 19, 2008
Spanish Rice

Spanish Rice
2 tablespoons vegetable oil
1 cup uncooked long-grain rice
1 onion, chopped
2 cups water
1 (10 ounce) can Rotel
1 teaspoon salt
Heat oil in a deep skillet over medium heat. Saute rice and onion until rice is lightly browned and onions are tender.
Stir in water, Rotel and salt. Cover, and simmer for 20 minutes, or until liquid is absorbed and rice is tender.
Refried Beans
I'd never made refried beans from scratch before, but these were really easy! If you have a slow cooker, you can cook them in there for 8 hours on high. I however, literally haven't used mine in years, so I couldn't find it, and instead just simmered them on the stove all day.
Sadly, I didn't get any pictures because we had company over and I wasn't thinking about it, but they were really good! Meg couldn't get enough of them!
Update! We had leftovers today, and I got a picture. : )
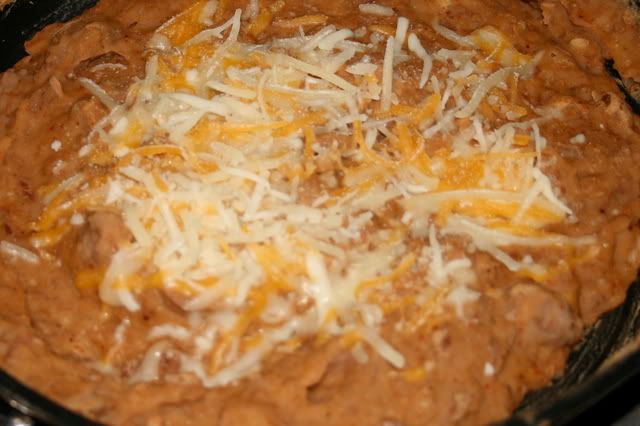
Refried Beans
1 lb dry pinto beans
1 onion, halved
2 cloves garlic, minced
2 tsp salt
water
2 Tbsp shortening or bacon grease
In a large pot, combine beans, onion, garlic and salt. Add enough water to cover by a few inches. Bring to a boil. Reduce heat and simmer several hours, stirring occasionally, until beans are very soft.
Drain beans and reserve liquid. Return pot to burner, and add shortening or bacon grease over medium heat. Add beans, stirring and mashing with the back of a spoon until they reach the desired texture. Add cooking liquid to thin as desired.
Wednesday, April 9, 2008
Almond, Shallot & Mushroom Rice Pilaf
Here's a quick and simple side dish that tastes great and goes with just about anything!
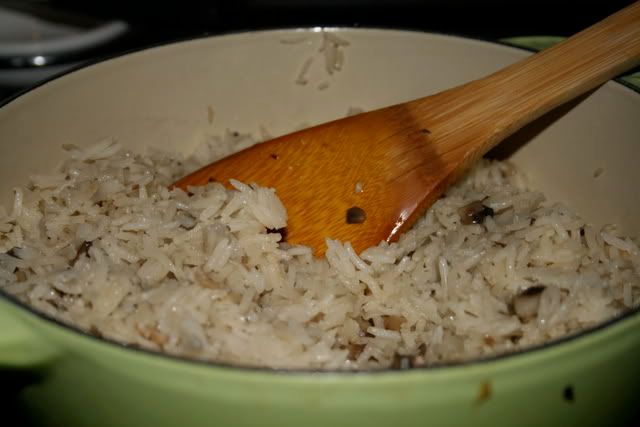
Almond, Shallot & Mushroom Rice Pilaf
2 Tbsp olive oil
1/2 cup slivered almonds
1 small shallot, diced
1/2 cup coarsely chopped mushrooms
1 cup long-grain rice (I used basmati)
2 cups water
1/2 tsp salt
Heat oil in a medium saucepan over medium-high heat. Sautee almonds shallots and mushrooms for 1 to 2 minutes, until they just begin to brown. Add rice and stir for 2 minutes to brown lightly. Add water and salt; stir to combine. Bring to a boil, then reduce heat, cover and simmer for 20 minutes. Fluff with a fork before serving.
Monday, March 31, 2008
Quinoa Salad

My friend Sarah posted this recipe on her blog, and it sounded so good that we had to try it! It's exactly the kind of food we're craving this week -- fresh, light and healthy -- after all the greasy (but delicious!) stuff we ate last week. I've never had quinoa before, but it's something I've been wanting to try for a long time.
The salad was delicious! The flavor is fresh and bright, and it's filling without being heavy. Thank you, Sarah, for a fabulous recipe!

I learned something about quinoa today. Before you cook it, it's like tiny little marbles, and it scatters e v e r y w h e r e if you spill it. Yikes. I bought a bag of it in bulk today at Whole Foods, and in the process of transferring it to a storage container, some of it spilled on the counter, and it rolled all over the place! Consider yourself warned.
Sarah says that the leftover quinoa that you don't use in the salad is great for breakfast, mixed with almond milk, blue agave nectar, raisins, applesauce and flax seed. Guess what we'll be having for breakfast tomorrow?
Quinoa Salad
1 c uncooked quinoa (rinsed)
1 red bell pepper, diced
1 c cilantro, chopped
1 small red onion, diced
1 c green onions, chopped
2 T lime juice
2 T red wine vinegar
2 T grapeseed oil
1.5 tsp salt
15 oz can of black beans, rinsed
Put 2 cups of water and the 1 cup of quinoa in a small saucepan. Bring to a boil. Cover, reduce heat to low and simmer 15-20 minutes until liquid is dissolved. Fluff with a fork. Put in fridge to chill.
Place chopped vegetables in a big bowl. Add oil, vinegar, salt, and mix well. Add 2 cups of quinoa (save the left over for another recipe) and mix. Fold in black beans.
Chill and serve.

Saturday, March 29, 2008
Cornbread
This is a Southern style cornbread, made without flour. It's salty, not sweet, and is dense and gritty. If you're expecting a sweet, fluffy, cake-like cornbread, this isn't the recipe for you. But it's fabulous with soup, chili, red beans and rice, and so forth. I made it tonight to go with our leftover gumbo.
Cornbread
4 to 5 tablespoons bacon grease, shortening or vegetable oil
2 eggs
1 1/2 cups corn meal
1 teaspoon salt
1/2 teaspoon baking soda
1 1/4 cups buttermilk
Preheat oven to 400. Place bacon grease, shortening or oil in an 8-inch skillet. Let heat in the oven until it's almost smoking. Meanwhile, mix the batter.
Beat the eggs in a medium bowl until frothy. Add the corn meal, salt and baking soda, and stir to thoroughly combine. Add the buttermilk and stir well.
Remove the hot pan from the oven. Swirl the pan to make sure it is coated with oil.
Pour the batter into the pan, and bake 25 to 30 minutes.
Monday, March 17, 2008
Gyoza
Tonight I made gyoza for dinner. Back in Japan we could get it fresh at any convenience store, or frozen at the grocery store or even at the 100 Yen store. Here, though, it's a little harder to find. We all love it, so I decided to give it my best shot making it myself. I found a recipe online that looked like what I had in mind, but it didn't have any ingredient measurements. Lovely. I gave it my best shot, however, and...success! It was a ton of work, but it was worth every minute. It tasted just as good as the best gyoza we had in Japan. Today was the first time I've cooked with meat at home since Brad's birthday in early February, and it was worth it!
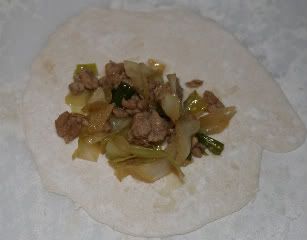
Now that I've made it successfully, I'll try it again and get some accurate measurements. In the meantime, though, I'll at least describe the steps. First I made a simple dough of flour and water, kneaded it for about 5 minutes, then set it aside while I made the filling. The filling consisted of ground pork, cabbage and green onions cooked together, and seasoned with sake, sesame oil, soy sauce, mirin, ginger and garlic.
Next, I pulled off little pieces of the dough, and rolled them into circles.
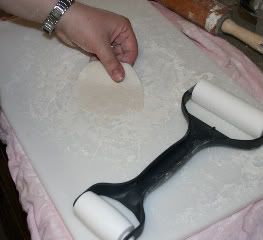
Then I spooned a little filling into the center of each circle, folded it over and sealed it.
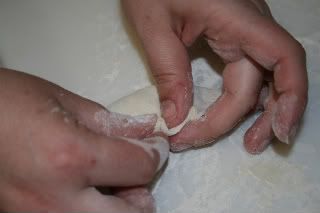
The edges are pleated 4 or 5 times. I'm not sure of the purpose behind this, or if it's just for aesthetics.

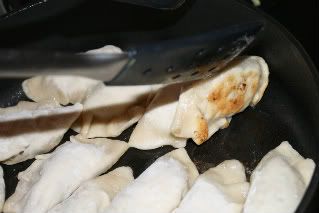
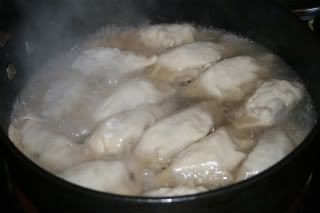
I heated a little oil in a skillet, and added the gyoza to lightly brown on one side.
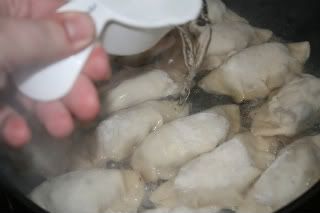
Once they were lightly brown, I poured in about 1/2 cup water, then covered and steamed them until the water was gone.
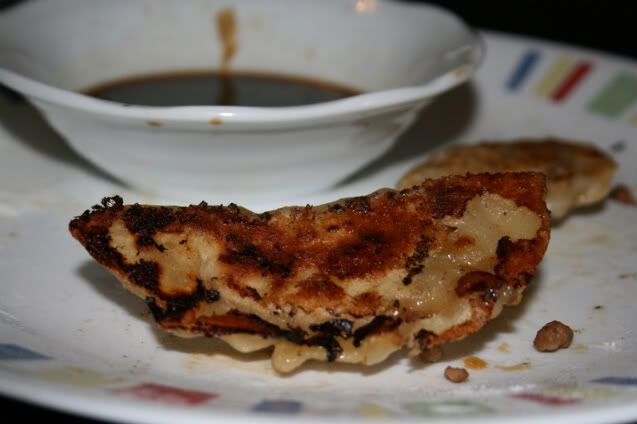
Once they finished steaming, I plated them up and we ate them with a soy sauce and vinegar mixture for dipping. Fabulous! I almost forgot to take a picture before we finished eating all of them. Here's one of the last ones.
Now that I've made it successfully, I'll try it again and get some accurate measurements. In the meantime, though, I'll at least describe the steps. First I made a simple dough of flour and water, kneaded it for about 5 minutes, then set it aside while I made the filling. The filling consisted of ground pork, cabbage and green onions cooked together, and seasoned with sake, sesame oil, soy sauce, mirin, ginger and garlic.
Next, I pulled off little pieces of the dough, and rolled them into circles.

Then I spooned a little filling into the center of each circle, folded it over and sealed it.


The edges are pleated 4 or 5 times. I'm not sure of the purpose behind this, or if it's just for aesthetics.

I heated a little oil in a skillet, and added the gyoza to lightly brown on one side.

Once they were lightly brown, I poured in about 1/2 cup water, then covered and steamed them until the water was gone.


Once they finished steaming, I plated them up and we ate them with a soy sauce and vinegar mixture for dipping. Fabulous! I almost forgot to take a picture before we finished eating all of them. Here's one of the last ones.

Friday, March 14, 2008
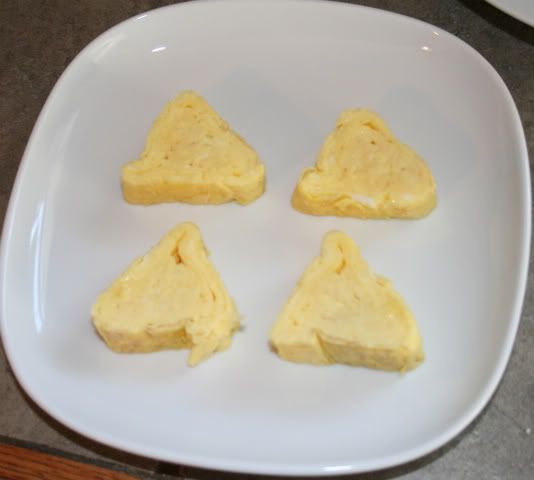
My take on tamagoyaki
I started making tamagoyaki (Japanese rolled eggs) last year when I began packing bentos for the kids, and Meg has been hooked ever since! That girl has an astonishing affinity for eggs, particularly of the hard-boiled, scrambled or omelet variety. One of her favorite things to eat is a plain egg omelet...no cheese, no meat, no veggies, just eggs. Tamagoyaki is great in that regard, because it doesn't have any filling. Traditional tamagoyaki has dashi stock, sugar, salt and soy sauce whisked into the egg before cooking. For Lydia I usually just add soy sauce and sugar, for a nice salty/sweet flavor, but Meg prefers hers with just plain eggs and nothing else.

I learned to make tamagoyaki from this tutorial, and have been off and running ever since. I have a cheapo rectangle pan that I bought at the Daiso in Japan, but I've had the best luck just using a standard crepe pan.
Meg asked for this for breakfast this morning, so I whipped one up. I will try to take more photos of the cooking process next time I make it, but for now, here it is: the finished product!
She likes it!

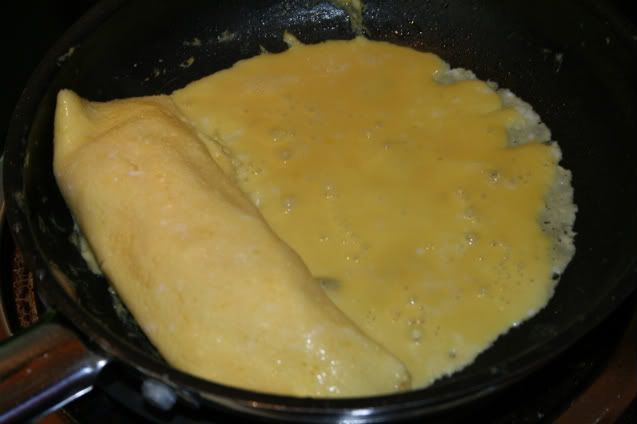
Updated: Meg requested this for breakfast again today, so I snapped a few more pictures of the process. Here's how it looks after several layers, while the last layer is cooking.
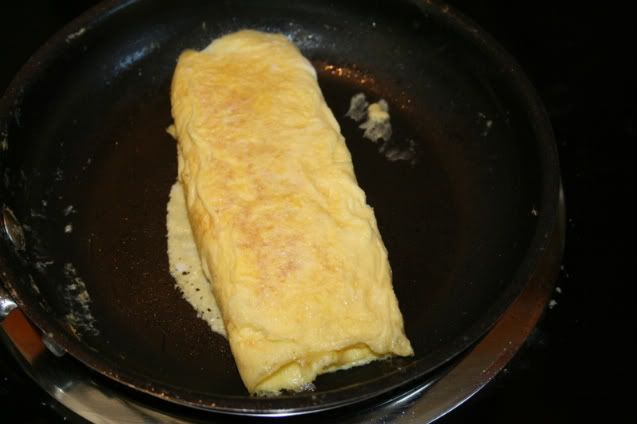
Here it is all rolled up.
Then I used a sushi mat to shape it into a triangle, then sliced it and had time to quickly snap a picture before Meg devoured it.

I learned to make tamagoyaki from this tutorial, and have been off and running ever since. I have a cheapo rectangle pan that I bought at the Daiso in Japan, but I've had the best luck just using a standard crepe pan.
Meg asked for this for breakfast this morning, so I whipped one up. I will try to take more photos of the cooking process next time I make it, but for now, here it is: the finished product!
She likes it!

Updated: Meg requested this for breakfast again today, so I snapped a few more pictures of the process. Here's how it looks after several layers, while the last layer is cooking.

Here it is all rolled up.

Then I used a sushi mat to shape it into a triangle, then sliced it and had time to quickly snap a picture before Meg devoured it.

Thursday, March 13, 2008
Spicy Cajun Potato Wedges
These make a great side dish, and are really easy and quick to throw together. Just be sure to plan ahead to allow for the baking time.
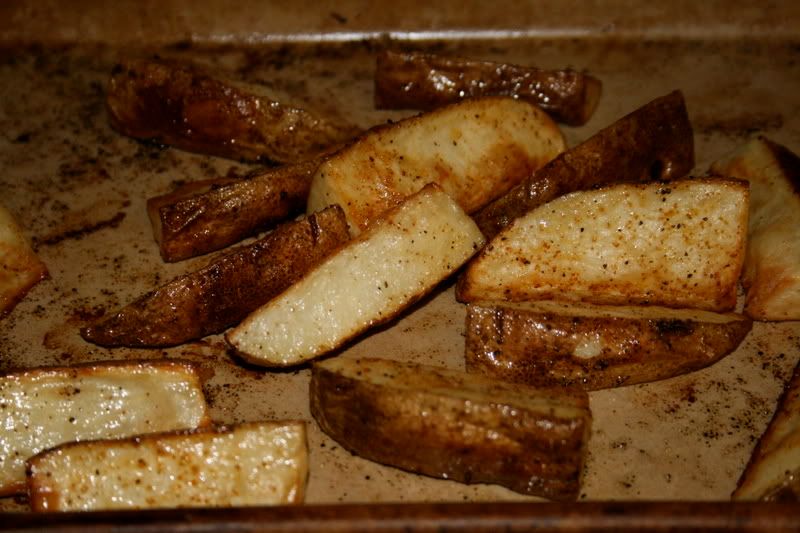
Spicy Cajun Potato Wedges
2 pounds potatoes, cut into wedges
2 Tbsp olive oil
2 tsp ground cumin
1 tsp hot chipotle chile powder
1/2 tsp oregano
1 tsp salt
1/4 tsp freshly ground black pepper
Preheat oven to 375. Lightly grease a large baking pan with cooking spray.
Toss potatoes with olive oil. Arrange potatoes in a single layer on prepared baking pan.
In a small bowl, combine cumin, chipotle chile powder, oregano, salt and pepper -- or just short-cut it and use cajun seasoning. Sprinkle evenly over potato wedges.
Bake in the preheated oven until crispy, turning occasionally, about 40 minutes.
Monday, March 10, 2008
Garlic Bread
1 stick butter
2 to 3 cloves garlic, pressed
1 loaf French bread, cut in half lengthwise
1/2 cup parmesan
Preheat oven to 350 degrees. Line a cookie sheet with foil.
Melt the butter in microwave. Add the pressed garlic to the butter, and stir to combine. With a spoon or pastry brush, spread the garlic butter over each half of the bread. Sprinkle parmesan cheese evenly on top.
Place the bread on the foil-lined cooke sheet, and bake 10 to 15 minutes, or until the bread is golden brown and crispy on the outside.
Subscribe to:
Posts (Atom)
