Showing posts with label TWD. Show all posts

Wednesday, July 2, 2008

Ice cream, sorbet, and TWD scones

This is going to be really short, unfortunately, because it's late and I'm just now getting a chance to sit down and blog. Busy day! Let me just do a quick recap, then I'm off to bed.

Photobucket

I'll start with the TWD scones. They're awesome! Since I'm trying to not eat dairy, and Brad doesn't care for dried apples, I just made cranberry scones instead. Some of the changes I made:

I soaked some Craisins in hot water to plump them up, instead of dried apples
I omitted the cheddar cheese
I used soy milk with vinegar in place of the buttermilk, and a mixture of soy milk and water instead of apple juice,
Instead of an egg, I used 1 Tbsp ground flax seed mixed with 3 Tbsp water, and an additional 1 1/2 Tbsp baking powder,
Instead of butter, I used all-vegetable shortening.

It worked really well! Brad, his mom, and the kids all loved them! I'm still amazed that the egg and buttermilk replacements worked that seamlessly in this recipe. And I absolutely love what the little bit of cornmeal added to the scones! I never would have thought to include that!

Photobucket

I give these scones a huge thumbs up! Woohoo!

Next let's move on to the frozen desserts I made yesterday and today. I ended up not bringing the vanilla custard to work to make ice cream, because it separated and was all weird this morning when I got it out of the fridge. I did bring the pineapple-orange-ginger sorbet, though, and it turned out beautifully! So yummy! Brad bought an ice cream maker on the way home today (after not being able to find one yesterday), and I put the custard in to freeze. I didn't eat it because of the whole dairy thing, but the kids loved it. Hooray!

Photobucket

The sorbet is by far my favorite, though. The orange and pineapple are so fruity and tropical, and the little bit of ginger I added really enhanced the flavors and gave it a nice kick. I love this stuff! But I did that one better. I put it in a glass like so:

Photobucket

...and the I topped it off with Malibu coconut rum. Oh, baby! What an incredible drink! I may have to just keep some sorbet on hand all the time so I can have one of these whenever I want. YUM!

Photobucket

Off to bed for this tired girl. Good night!

Tuesday, June 24, 2008

TWD - Mixed Berry Cobbler

Tuesdays with Dorie! And I'm on time, even if not early in the day. Woohoo!

Photobucket

This week's recipe was chosen by Beth of Our Sweet Life. I was super stoked about this recipe, because I adore blackberry cobbler! Yum! I wish I still lived in Seattle, where blackberries literally grow wild like weeds, and you can pick them by the bucketful for free. Here, though, the best I could do was frozen berries from our local produce stand. Works for me!

I put this together as soon as I walked in the door from work, since I knew it had a long baking time. It was ridiculously simple to make, just a quick biscuit dough, and a few ingredients tossed with the berries. I used 4 cups of blackberries and 2 cups of raspberries. That's a little more berries than the recipe called for, and I honestly wish I had used even more. I made mine in a 9x9 square pan rather than a deep pie dish, so I could have easily fit several more cups. So if I were going to make this again, I'd use 8 cups of frozen berries, and increase the other filling ingredients accordingly. In my book, you can never have too much berry filling.

Oh! I almost forgot to add that I used vegan margarine instead of butter, and almond milk instead of cream, and the topping turned out great! And I served it with dairy-free vanilla ice cream. Another successful veganization! Woot!

All in all, this isn't my favorite cobbler recipe, but it was still delicious!

Photobucket

Monday, June 16, 2008

TWD - Cream Puff Ring

Photobucket

Tuesdays with Dorie time! Hooray!

This week's recipe, Peppermint Cream Puff Ring, was chosen by Caroline of A Consuming Passion. I'd only made cream puffs once before, years ago, so I was looking forward to making them again.

The cream puff dough came together in a snap, and was easy enough to pipe into a circle. I didn't have a pastry bag, so I just used a Ziploc gallon bag, and snipped off the corner. Who says I'm not resourceful? It baked and puffed up beautifully. And then collapsed. Huh. But no harm done, because by the time I sawed off the top, filled the bottom with whipped cream, and placed the top back on, it looked great! I chose not to flavor my cream with mint, and instead just gave it a little shot of vanilla extract for flavoring. And I again took a shortcut and mixed up my chocolate glaze in the microwave, and it worked like a charm.

This recipe was enjoyed by all, adults and children alike. Success!

My pictures, on the other hand, SUCK. I don't know what was up with my camera, or maybe it was just too dark in our house, but even after I did all I could to adjust the lighting on my computer, they're still dark and dull. Lame. I'll share them anyway, just don't judge me by these photos, ok?

Photobucket

Here's Lydia, my goofbug, checking it for structural integrity.

Photobucket

Wednesday, June 11, 2008

TWD - La Palette’s Strawberry Tart

Tuesdays with Dorie time! Or Wednesdays with Dorie, in my case. Sorry I wasn't able to deliver yesterday, but better late than never, right?

This week's recipe, La Palette's Strawberry Tart, was chosen by Marie of A Year at Oak Cottage. The kids and I adore strawberries, but Brad hates them. Alas, no dessert for him. I don't often make things that I know he won't enjoy, but I didn't want to miss another week of TWD, and I've never made a strawberry pie or tart before, so I went for it.

Photobucket

It was easy peasy to make. The crust is a cinch, then I just brushed it with strawberry jam, filled it with halved strawberries, drizzled with them a little Chambord, and served it with a dollop of freshly whipped cream on top. Voila!

There were a few speed bumps along the way, but they were minor. First, I didn't realize that we were out of butter when it came time to make the crust, so I had to use two parts vegan margarine, one part shortening, and one part vegetable oil. Yikes! I also left out the egg yolk, just to see how it would work without, and it turned out beautifully! I also didn't have fine quality strawberry jam, but you know what? The cheapo generic kind I buy for the kids sandwiches worked just fine. And the only fruity liqueur I had was Chambord. Again, though...it worked. And really well! We're on a budget, us later-in-life-returning to-college students, so I'm glad I was able to piece this tart together with what we had on hand. All I had to buy was strawberries and whipping cream. Nice!

Photobucket

I think my overall preference is my mom's fresh strawberry pie, made with a cream cheese layer in the pre-baked crust, then topped with fresh strawberries and a strawberry glaze. But this is such a nice, simple, fresh tart, and I love it for what it is!

If you don't have Dorie's book yet, I highly recommend you go get a copy. The decision has been made to no longer post the recipes in our blogs, which I think is awesome, but hopefully the recipes you've seen here, as well as on other blogs, will be the motivation you need to run out and get yourself your own copy of this book. I love it! Plus, then you could join in on the TWD fun!

If you do as I did, and use non-dairy fats in the crust, and (not as I did) use a non-dairy whipped topping, this would be a vegan recipe. Nice!

Tuesday, June 10, 2008

Late again

Hey folks,

I haven't had a chance to make my Tuesdays with Dorie strawberry tart yet, because we were at baseball games all weekend, and I woke up today with one of the worst headaches of my life, and didn't even make it to work today. It will be challenge enough to get dinner on this evening, so my tart will make its appearance tomorrow evening after work. Sorry for the delay, but be sure to check back tomorrow evening, or later in the week!

Tuesday, June 3, 2008

TWD - Thanks for waiting!

First off, to the lovely people who commented about my sweet new puppy: Thank you! He is such a sweetie, and we just love him to pieces already! We got him from the same animal shelter where we adopted Gretel a couple months ago. In fact, when we adopted Gretel, we held Ringo and his siblings who had just been born a month before, but we weren't in the market for such a young puppy at the time. Little did we know that we'd be back a few months later to adopt the little guy. A really quick PSA: please support and adopt from your local animal shelter! There are so many awesome dogs who will be put down otherwise, but who are longing for a family to love. Check them out next time you're looking to add to your family.

Ok, now onto food.

It's time again for Tuesdays with Dorie. Di of Di's Kitchen Notebook chose this week's recipe, French Chocolate Brownies. And holy cow! These brownies rock!

At first when I read the recipe, I was nonplussed. Raisins? In brownies? Really? All week I was less than thrilled about this recipe, but then it hit me today: Raisins + Chocolate = Raisinettes. And the drooling commenced.

Photobucket

I worked all day today, and then I started these as soon as I got home. I cheated and melted my chocolate in the microwave, and they came together in a snap. I will admit that the batter tasted so good that we were on the verge of foregoing baking, and just eating it raw with a spoon, but we kept ourselves in check, and I'm glad that we did.

They're amazing! They're incredible! They're the best brownies I've ever tasted! I think they're going to become that go-to brownie recipe that I make often. Thank you, Di, for choosing such an amazing recipe!

Sadly, photos don't do these justice, or at least mine don't. But take my word for it, they're incredible!

Photobucket

French Chocolate Brownies
- makes 16 brownies
Adapted from Baking From My Home to Yours

Ingredients
1/2 cup all-purpose flour
1/8 teaspoon salt
1/8 teaspoon cinnamon (optional)
1/3 cup raisins, dark or golden
1 1/2 tablespoons water
1 1/2 tablespoons dark rum
6 ounces bittersweet chocolate, finely chopped
1 1/2 sticks (12 tablespoons; 6 ounces) unsalted butter, at room temperature and cut into 12 pieces
3 large eggs, at room temperature
1 cup sugar

Getting ready:
Center a rack in the oven and preheat the oven to 300°F. Line an 8-inch square baking pan with foil, butter the foil, place the pan on a baking sheet, and set aside.

Whisk together the flour, salt and cinnamon, if you're using it.

Put the raisins in a small saucepan with the water, bring to a boil over medium heat and cook until the water almost evaporates. Add the rum, let it warm for about 30 seconds, turn off the heat, stand back and ignite the rum. Allow the flames to die down, and set the raisins aside until needed.

Put the chocolate in a heatproof bowl and set the bowl over a saucepan of simmering water. Slowly and gently melt the chocolate, stirring occasionally. Remove the bowl from the saucepan and add the butter, stirring so that it melts. It's important that the chocolate and butter not get very hot. However, if the butter is not melting, you can put the bowl back over the still-hot water for a minute. If you've got a couple of little bits of unmelted butter, leave them—it's better to have a few bits than to overheat the whole. Set the chocolate aside for the moment.

Working with a stand mixer with the whisk attachment, or with a hand mixer in a large bowl, beat the eggs and sugar until they are thick and pale, about 2 minutes. Lower the mixer speed and pour in the chocolate-butter, mixing only until it is incorporated—you'll have a thick, creamy batter. Add the dry ingredients and mix at low speed for about 30 seconds—the dry ingredients won't be completely incorporated and that's fine. Finish folding in the dry ingredients by hand with a rubber spatula, then fold in the raisins along with any liquid remaining in the pan.

Scrape the batter into the pan and bake 50 to 60 minutes, or until the top is dry and crackled and a knife inserted into the center of the cake comes out clean. Transfer the pan to a rack and allow the brownies to cool to warm or room temperature.

Carefully lift the brownies out of the pan, using the foil edges as handles, and transfer to a cutting board. With a long-bladed knife, cut the brownies into 16 squares, each roughly 2 inches on a side, taking care not to cut through the foil.

Serving:
The brownies are good just warm or at room temperature; they're even fine cold. I like these with a little something on top or alongside—good go-alongs are whipped crème fraiche or whipped cream, ice cream or chocolate sauce or even all three!

Storing:
Wrapped well, these can be kept at room temperature for up to 3 days or frozen for up to 2 months.

Tuesday, May 27, 2008

TWD - Sorry, folks...

...but there's no Tuesdays with Dorie for me this week. Initially I was looking forward to making the sticky rolls, but then I looked more closely at the recipe. More than FOUR STICKS of butter? Are you kidding me??? I'm sorry, but I just couldn't bring myself to do it.

Here's a link to some fabulous cinnamon rolls I made not too long ago, though, if you're interested. ; )

On top of that, I just started a new job late last week, and we had a bunch of activities with family and friends this weekend, so there wasn't time for baking. But check back next week!

Tuesday, May 20, 2008

Tuesdays with Dorie - Traditional Madeleines

It's time again for Tuesdays with Dorie! This week's recipe, Traditional Madeleines, was chosen by Tara of Smells Like Home. I was really excited about this week's recipe, because I've always wanted to make Madeleines. I lived in Spain for much of elementary and junior high school, and we always used to buy bags of Spanish Magdalenas. They're much like Madeleines, but in mini cupcake form rather than shells.

I bought a Madeleine pan a couple years ago in Japan, but have never used it until now. It's about time, right?

The batter was ridiculously easy to mix up, with just a few simple ingredients. It needs to chill at least three hours, or up to two days, so there's tons of flexibility with this recipe. Mix up the batter when you have a few spare minutes, then come back to it sometime within the next two days, and you're good to go. They bake very quickly, too, just over 10 minutes, so the active time spent on this recipe is really minimal.

My pan only holds six Madeleines, which is probably a good thing, since I didn't know exactly how full to fill them. Turns out I filled the first pan too high. Woops. I baked them for 11 minutes, not being sure exactly how brown they were supposed to get. And in spite of very generously buttering and flouring the pan, they still stuck like you wouldn't believe. I whacked them against the counter and everything, but they didn't budge. Big bummer. I chalked it up to it being a brand new pan.

Photobucket

You may want to shield your eyes. This ain't pretty.

Photobucket

The carnage!

The second batch, however, turned out beautifully! I cooked them for the full 14 minutes, figuring that that may have been part of the reason the first batch stuck as much as they did. And this time when I rapped the pan on the counter, to my delight, the Madeleines popped right out. Woohoo!

Everyone has been talking about the characteristic bump on the non-scalloped side of the Madeleines. I think mine had it. I mean, they weren't flat or anything, and they did bump up nicely on that side, but I don't know if there was something more I should have been shooting for. No matter, though, because they tasted incredible. Soft inside, with a little crispiness on the outside. Absolutely amazing. I can't wait to make these again!

Photobucket

Photobucket

Photobucket

Traditional Madeleines
From Dorie Greenspan's Baking: From My Home to Yours


2/3 cup all-purpose flour
¾ teaspoon baking powder
Pinch of salt
½ cup sugar
Grated zest of 1 lemon
2 large eggs, at room temperature
2 teaspoons pure vanilla extract
¾ stick (6 tablespoons) (85g) unsalted butter, melted and cooled
Confectioners’ sugar, for dusting

Whisk together the flour, baking powder and salt.

Working in a mixer bowl, or in a large bowl, rub the sugar and lemon zest together with your fingertips until the sugar is moist and fragrant. Add the eggs to the bowl. Working with the whisk attachment, or with a hand mixer, beat the eggs and sugar together on medium-high speed until pale, thick and light, 2 to 3 minutes. Beat in the vanilla. With a rubber spatula, very gently fold in the dry ingredients, followed by the melted butter. Press a piece of plastic wrap against the surface of the batter and refrigerate it for at least 3 hours, or for up to 2 days. This long chill period will help the batter form the hump that is characteristic of madeleines. (For convenience, you can spoon the batter into the madeleine molds, cover and refrigerate, then bake the cookies directly from the fridge; see below for instructions on prepping the pans.)

GETTING READY TO BAKE: Center a rack in the oven and preheat the oven to 400 degrees F. Butter 12 full-size madeleine molds, or up to 36 mini madeleine molds, dust the insides with flour and tap out the excess. Or, if you have a nonstick pan (or pans), give it a light coating of vegetable cooking spray. If you have a silicone pan, no prep is needed. Place the pan(s) on a baking sheet.

Spoon the batter into the molds, filling each one almost to the top. Don’t worry about spreading the batter evenly, the oven’s heat will take care of that. Bake large madeleines for 11 to 13 minutes, and minis for 8 to 10 minutes, or until they are golden and the tops spring back when touched. Remove the pan(s) from the oven and release the madeleines from the molds by rapping the edge of the pan against the counter. Gently pry any recalcitrant madeleines from the pan using your fingers or a butter knife. Transfer the cookies to a rack to cool to just warm or to room temperature.

If you are making minis and have more batter, bake the next batch(es), making certain that you cool, then properly prepare the pan(s) before baking.

Just before serving, dust the madeleines with confectioners’ sugar.

Makes 12 large or 36 mini cookies

Serving: Serve the cookies when they are only slightly warm or when they reach room temperature, with tea or espresso.

Storing: Although the batter can be kept in the refrigerator for up to 2 days, the madeleines should be eaten soon after they are made. You can keep them overnight in a sealed container, but they really are better on day 1. If you must store them, wrap them airtight and freeze them; they’ll keep for up to 2 months.

Tuesday, May 13, 2008

Tuesdays with Dorie - Florida Pie

It's Tuesday, and you know what that means: Tuesdays with Dorie! I have to tell you, I look forward to this all week. I'm having such a good time baking something new every week, and am always eager to see what's coming up the next week.

This week's recipe is Florida Pie, chosen by Dianne of Dianne's Dishes. I didn't have the cookbook handy when I first heard that this was the upcoming recipe, and I'd never heard of a Florida Pie before, so I did a quick Google search to see what it might be. I found such unappetizing things as a cream pie with pineapples, maraschino cherries and other canned fruits. Um...ick. So I was nervous. But when I pulled out the cookbook and found that Dorie's Florida Pie is a hybrid of coconut cream and key lime pies, I was delighted!

It was, as with most Dorie recipes I've made, much simpler than it looks. I used a store-bought graham cracker crust because I was taking the pie to my mother-in-law for Mother's Day, and didn't want her to have to worry about my pie plate afterwards. So that was easy! The coconut cream filling was also very simple, just coconut and heavy cream simmered together until they formed a fabulous, thick coconut cream. The key lime filling couldn't have been easier, and the pie only bakes for a matter of minutes before chilling. I used bottled key lime juice because my beloved citrus press broke awhile back, and frankly I didn't feel like juicing a ton of tiny little limes.

The only problem I encountered was my meringue. I haven't made a meringue in years, and for some reason mine turned out kind of chunky. Huh. I don't know if I beat it too long, or not long enough (that's what she said :snort:), but I wasn't pleased with how it turned out. Not only was it chunky, but it also weeped like you can't believe. I mean, it didn't just weep, it sat itself down and had a full-on emotional cryfest, such that the edge of the crust was all goopy. It still tasted delicious, though, so I won't count it as a failure, but merely as room for improvement. Oh, and I opted not to add coconut to the meringue topping, and instead just sprinkled a little on top, where it toasted nicely as the meringue browned.

Photobucket

We ended up going out for lunch on Mother's Day, along with Brad's aunt, his cousin and her husband, his mom, stepdad and little brother, and we all had the pie for dessert. The pie was enjoyed by all, although I did learn that many of the people there don't care for coconut. But no problem, because we're heading back over this afternoon, and I had a cup and a half of key lime juice left, so this morning I whipped up three traditional key lime pies. One for us, one for my mother-in-law, and one for Brad's grandpa who was in the hospital and couldn't have any yesterday. Turns out he loves key lime pie, so he was sorely disappointed when he found that we would be having some at lunch. I couldn't resist making one just for him, and hope he'll be able to have some today. : )

Oh, and I should add that I will definitely make this pie again! I loved what the coconut cream layer added to the key lime filling. They went together beautifully, and made for an absolutely delicious pie. Success! Thank you, Dianne, for choosing this week's recipe!

I didn't get any pictures of the sliced Florida Pie, but here's a picture of one of my key lime pies instead.

Photobucket

Florida Pie

1 9-inch graham cracker crust (page 235), fully baked and cooled, or a store-bought crust
1 1/3 cups heavy cream
1 1/2 cups shredded sweetened coconut
4 large eggs, seperated
1 14-ounce can sweetened condensed milk
1/2 cup fresh Key (or regular) lime juice (from about 5 regular limes)
1/4 cup of sugar

Getting Ready:

Center a rack in the oven and preheat the oven to 350 degrees F. Put the pie plate on a baking sheet lined with parchment of a silicone mat.

Put the cream and 1 cup of the coconut in a small saucepan and bring it to a boil over medium-low heat, stirring almost constantly. Continue to cook and stir until the cream is reduced by half and the mixture is slightly thickened. Scrape the coconut cream into a bowl and set it aside while you prepare the lime filling.

Working with a stand mixer, preferably fitted with a paddle attachment, or with a hand mixer in a large bowl beat the egg yolks at high speed until thick and pale. Reduce the mixer speed to low and beat in the condensed milk. Still on low, add half of the lime juice. When it is incorporated, add the reaming juice, again mixing until it is blended. Spread the coconut cream in the bottom of the graham cracker crust, and pour over the lime filling.

Bake the pie for 12 minutes. Transfer the pie to a cooling rack and cool for 15 minutes, then freeze the pie for at least 1 hour.

To Finish the Pie with Meringue:

Put the 4 egg whites and the sugar in a medium heavy-bottomed saucepan and heat over medium-low heat, whisking all the while, until the whites are hot to the touch. Transfer the whites to a stand mixer, fitted with the whisk attachment, or use a hand mixer in a large bowl, and beat the whites at high speed until they reach room temperature and hold firm peaks. Using a rubber spatula, fold the remaining 1/2 cup coconut into the meringue.

Spread the meringue over the top of the pie, and run the pie under the broiler until the top of the meringue is golden brown. (Or, if you've got a blowtorch, you can use it to brown the meringue.) Return the pie to the freezer for another 30 minutes or for up to 3 hours before serving.

Tuesday, May 6, 2008

Tuesdays with Dorie: Peanut Butter Torte

Photobucket

So. Not the most exciting Tuesdays with Dorie recipe for me this week. Elizabeth of Ugg Smell Food chose the Peanut Butter Torte. Brad hates peanut butter, and I'm reluctant to spend time and money making something that it's fairly certain he won't enjoy. Beyond that, I've had peanut butter pie once before, and as excited as I was about it, I didn't really care for it. I should probably add, though, that my one experience with peanut butter pie was about 24 years ago, when I was 8 years old and we had gone to Magic Mountain for the day, and stopped at Marie Calendar's on the way home. I was so stoked to try some peanut butter pie, but it was just.....eh. When I tried the peanut butter filling of this torte, it tasted much like that peanut butter pie I had nearly a quarter of a decade ago, so I was less than thrilled.

Photobucket

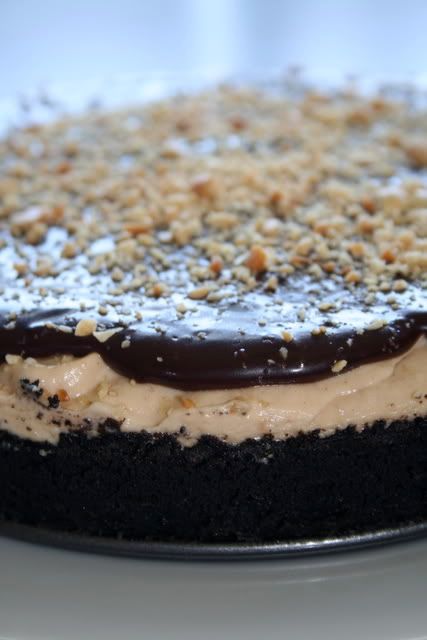
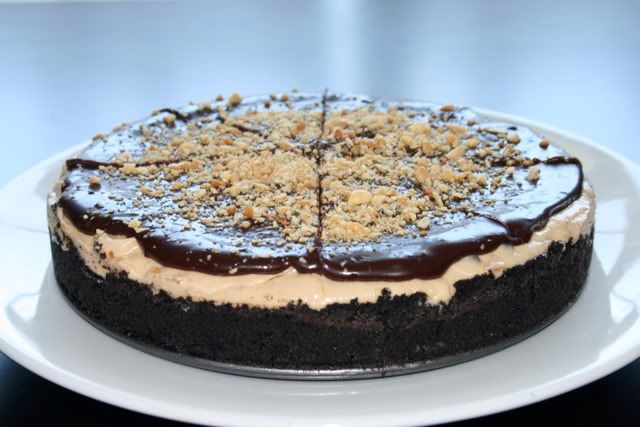
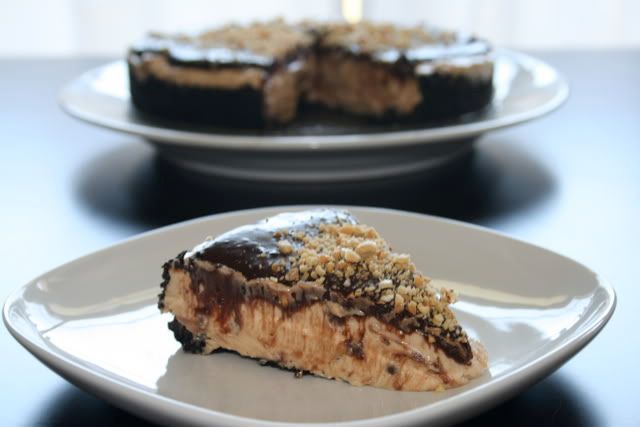
The torte was surprisingly easy to make. I'm not typically a fan of multi-part recipes, but in spite of that, this was really simple to put together. I halved the recipe and made it in a 6-inch springform pan, which it fit nicely. It wasn't a towering, majestic torte like the one pictured in the book, but it was still attractive and impressive. I think that if someone saw it in a dessert case, they'd definitely buy it, so I give the torte points for that!

I felt that the crust could have used more Oreos. I didn't even attempt to bring my crust very high up the edges, but even so, the bottom was patchy in spots. I didn't stress about it, however, because it was going to be covered with the peanut butter filling anyway, so no big deal.

Photobucket

I made the torte, minus the ganache topping, on Saturday night, and added the ganache Sunday afternoon. Shortly after that it was time for taste testing. And. Well. Brad didn't like it, and neither did the kids. I wasn't expecting Brad to like it, so no big surprise there, but I really thought the kids would love it. They each tried one bite, then said "no, thank you", and pushed their plates away. Bummer.

As for me? Well, I thought it was ok. I'm a big lover of most things peanut butter and chocolate, but this just didn't do it for me. It was good, don't get me wrong, but it wasn't as great as I've come to expect from Dorie's recipes. I didn't care for the cinnamon in the filling. Even though it was just a tiny bit, I didn't like how it tasted. I had been afraid, upon trying a taste of the filling, that the torte would be too salty, but it was balanced out by the crust and ganache, so that wasn't a problem. I honestly can't really put my finger on why I didn't like it. I just didn't. :sigh:

They can't all be winners, right? And maybe I could take it to my Anthropology final tomorrow and sell it by the slice. ; )

Oh, and seriously? 6 to 8 servings for the whole recipe? Are you kidding me? I made a half batch, and it would easily make 8 generous servings. I honestly can't imagine eating 1/6 of the whole recipes. Whoa.

Photobucket

Peanut Butter Torte

1 ¼ c. finely chopped salted peanuts (for the filling, crunch and topping)
2 teaspoons sugar
½ teaspoon instant espresso powder (or finely ground instant coffee)
¼ teaspoon ground cinnamon
Pinch of freshly grated nutmeg
½ c. mini chocolate chips (or finely chopped semi sweet chocolate)
24 Oreo cookies, finely crumbed or ground in a food processor or blender
½ stick (4 tablespoons) unsalted butter, melted and cooled
Small pinch of salt
2 ½ c. heavy cream
1 ¼ c confectioners’ sugar, sifted
12 ounces cream cheese, at room temperature
1 ½ c salted peanut butter – crunchy or smooth (not natural; I use Skippy)
2 tablespoons whole milk
4 ounces bittersweet chocolate finely chopped

Getting ready: center a rack in the oven and preheat the oven to 350°F. Butter a 9-inch Springform pan and place it on a baking sheet lined with parchment or a silicone mat.

Toss ½ cup of the chopped peanuts, the sugar, espresso powder, cinnamon, nutmeg and chocolate chops together in a small bowl. Set aside.

Put the Oreo crumbs, melted butter and salt in another small bowl and stir with a fork just until crumbs are moistened. Press the crumbs evenly over the bottom and up the sides of the spring form pan (they should go up about 2 inches on the sides). Freeze the crust for 10 minutes.

Bake the crust for 10 minutes, then transfer it to a rack and let it cool completely before filling.

Working with a stand mixer fitted with the whisk attachment or with a hand mixer in a large bowl, whip 2 cups of the cream until it holds medium peaks. Beat in ¼ cup of the confectioners’ sugar and whip until the cream holds medium-firm peaks. Crape the cream into a bowl and refrigerate until needed.

Wipe out (do not wash) the bowl, fit the stand mixer with the paddle attachment if you have one, or continue with the hand mixer, and beat the cream cheese with the remaining 1 cup confectioners’ sugar on medium speed until the cream cheese is satiny smooth. Beat in the peanut butter, ¼ cup of the chopped peanuts and the milk.

Using a large rubber spatula, gently stir in about one quarter of the whipped cream, just to lighten the mousse. Still working with the spatula, stir in the crunchy peanut mixture, then gingerly fold in the remaining whipped cream.

Scrape the mouse into the crust, mounding and smoothing the top. Refrigerate for at least 4 hours, or overnight; cover with plastic wrap as soon as the mousse firms.

To Finish The Torte: put the chopped chocolate in a heatproof bowl and set the bowl over a saucepan of simmering water. Leave the bowl over the water just until the chocolate softens and starts to melt, about 3 minutes; remove the bowl from the saucepan.

Bring the remaining ½ cup cream to a full boil. Pour the cream over the chocolate and , working with a a rubber spatula, very gently stir together until the ganache is completely blended and glossy.

Pour the ganache over the torte, smoothing it with a metal icing spatula. Scatter the remaining ½ cup peanuts over the top and chill to set the topping, about 20 minutes.

When the ganache is firm, remove the sides of the Springform pan; it’s easiest to warm the pan with a hairdryer, and then remove the sides, but you can also wrap a kitchen towel damped with hot water around the pan and leave it there for 10 seconds. Refrigerate until ready to serve.

Photobucket

Tuesday, April 29, 2008

Tuesdays with Dorie - Fluted Polenta and Ricotta Cake

Photobucket

I have to admit, I wasn't very excited about this week's TWD. The recipe was chosen by Caitlin of Engineer Baker. It didn't sound appetizing or even intriguing, so it was hard to get excited about it. I finally got down to business and made it on Monday.

I modified the recipe fairly heavily. I didn't read it very closely before going to the store, so I neglected to pick up a lemon. I had an orange in the fridge, however, so I used it instead. I don't like figs at all, so I subbed some chunks of fresh purple plums instead -- something I've been wanting to cook with for awhile. When it came time to mix up the cake, I also realized that I was short on honey, so I used a half cup of honey and about a quarter cup of blue agave nectar. The batter tasted just fabulous, and I happily licked the spatula after I popped the cake into the oven.

Photobucket

Ok. This? This is the reason I joined Tuesdays with Dorie. This cake is amazing! It's been out of the oven for 15 minutes, and I'm already on my second piece! It's so soft, moist and velvety, but with a little crunch here and there. The orange zest is incredibly fragrant. The chunks of plum are tart and fresh. The fluted edges are lightly browned and crispy. I love this cake. And I never would have made it if I hadn't joined TWD. I would have continued to scrunch my nose and flip past this page in the cookbook, and never would have known what I was missing. Hooray for Tuesdays with Dorie! And thank you, Caitlin, for such a great choice!

Photobucket

Fluted Polenta and Ricotta Cake

About 16 moist, plump dried Mission or Kadota figs, stemmed [I used 3 fresh red plums, cut in eighths)
1 c. medium-grain polenta or yellow cornmeal
½ c. all-purpose flour
1 tsp baking powder
1 c. ricotta
1/3 c. tepid water
¾ c. sugar [I reduced this to 1/2 cup]
¾ c. honey (if you’re a real honey lover, use a full-flavored honey such as chestnut, pine, or buckwheat) [I used 1/3 cup honey and a scant 1/4 cup blue agave nectar]
Grated zest of 1 lemon [I used the zest of 1 orange]
2 large eggs

Getting Ready: Center a rack in the oven and preheat the oven to 325 degrees F. Butter a 10 ½-inch fluted tart pan with a removable bottom and put it on a baking sheet lined with parchment or a silicone mat.

Check that the figs are, indeed, moist and plump. If they are the least bit hard, toss them into a small pan of boiling water and steep for a minute, then drain and pat dry. If the figs are large (bigger than a bite), snip them in half.

Whisk the polenta, flour, baking powder, and salt together.

Working with a stand mixer fitted with the whisk attachment or with a hand mixer in a large bowl, beat the ricotta and water together on low speed until very smooth. With the mixer at medium speed, add the sugar, honey, and lemon zest and beat until light. Beat in the melted butter, then add the eggs one at a time, beating until the mixture is smooth. Reduce the mixer speed to low and add the dry ingredients, mixing only until they are fully incorporated. You’ll have a sleek, smooth, pourable batter.

Pour about one third of the batter into the pan and scatter over the figs. Pour in the rest of the batter, smooth the top with a rubber spatula, if necessary, and dot the batter evenly with the chilled bits of butter.

Bake for 35 to 40 minutes, or until a thin knife inserted into the center of the cake comes out clean. The cake should be honey brown and pulling away just a little from the sides of the panm, and the butter will have left light-colored circles in the top. Transfer the cake to a rack and remove the sides of the pan after about 5 minutes. Cool to warm, or cool completely.

Photobucket

Tuesday, April 22, 2008

TWD - Bill's Big Carrot Cake

Photobucket

This was my first time ever making a carrot cake. I've wanted to for a long time, but all that work of peeling the carrots and shredding them up just seemed like more than I wanted to deal with. Yes, I'm lazy. ; ) So I was really excited when I saw that Amanda of Slow Like Honey had chosen carrot cake as this week's Tuesdays with Dorie recipe! It was just the little nudge I needed to get my butt in gear and make a freaking carrot cake.

We had Brad's family over for dinner on Friday, so it was the perfect opportunity to make the cake and share it with others. I love to bake, as you've probably figured out by now, but I hate having a whole batch of sweets for just the four of us. Dangerous!

I didn't take any pictures of the carrot cake prep, just because I had a lot to do with getting ready for dinner, and didn't have a lot of time for stopping and shooting. I was a little nervous putting the cakes in the oven, as the batter seemed much more carroty than I had expected. Never having made carrot cake before, though, I had no frame of reference. I wasn't sure if the 3 cups of carrots the recipe called for meant 3 cups firmly packed, or 3 cups lightly spooned in, or what, so I ended up going for somewhere in between the two, and just hoped it was right.

I had nothing to worry about, though. This cake turned out beautifully! I mean, it was really, really fantastic, and so much easier than I had anticipated. The cakes baked quickly, and tipped right out of the pan with no trouble at all. They were nicely flat and level, so they stacked up neatly for frosting. I saw that a lot of people had trouble with their cakes sinking, but mine were really nice and flat. I guess I got lucky!

Photobucket

And oooooh, the frosting! The lemon flavoring made all the difference in the world, and elevated cream cheese frosting (which I dare say is near perfect already) into something even more fabulous. My only complaint about the frosting was that it wasn't quite enough to fill and frost the whole cake. It would have been more than enough for just filling between the layers and frosting on top, but I had to spread it pretty thin to cover the whole cake. I actually preferred the thinner layer of frosting when eating, as I hate it when frosting overpowers a cake, but it just didn't look as pretty with the cake showing through in spots. Ah, the dilemma. ; )

I toasted up some coconut and piled it on top of the cake. So pretty! I'll definitely make this cake again!

Photobucket

Bill's Big Carrot Cake
Baking: From My Home to Yours by Dorie Greenspan
Yields 10 servings

Ingredients:

For the cake:
2 cups all purpose flour
2 teaspoons baking powder
2 teaspoons baking soda
2 teaspoons ground cinnamon
¾ teaspoon salt
3 cups grated carrots (about 9 carrots, you can grate them in food processor fitted w/ a shredding a blade or use a box grater)
1 cup coarsely chopped walnuts or pecans
1 cup shredded coconut (sweetened or unsweetened)
½ cup moist, plump raisins (dark or golden) or dried cranberries
2 cups sugar
1 cup canola oil
4 large eggs

For the frosting:
8 ounces cream cheese, room temperature
1 stick ( 8 tablespoons) unsalted butter, at room temperature
1 pound or 3 and ¾ cups confectioners' sugar, sifted
1 tablespoon fresh lemon juice or ½ teaspoon pure lemon extract
½ cup shredded coconut (optional)
Finely chopped toasted nuts and/or toasted shredded coconut (optional)

Getting ready:
Position the racks to divide the oven into thirds and preheat the oven to 325 degrees Fahrenheit. Butter three 9-x-2-inch round cake pans, flour the insides, and tap out the excess. Put the two pans on one baking sheet and one on another.

To make the cake:
Whisk the flour, baking powder, baking soda, cinnamon and salt. In another bowl, stir together the carrots, chopped nuts, coconut, and raisins.
Working with a stand mixer, preferably fitted with a paddle attachment, or with a hand mixer in a large bowl, beat the sugar and oil together on a medium speed until smooth. Add the eggs one by one and continue to beat until the batter is even smoother. Reduce the speed to low and add the flour mixture, mixing only until the dry ingredients disappear. Gently mix the chunky ingredients. Divide the batter among the baking pans.
Bake for 40-50 minutes, rotating the pans from top to bottom and front to back at the midway point, until a thin knife inserted into the centers comes out clean. The cakes will have just started to come away from the sides of the pans. Transfer the cakes to cooling racks and cool for about 5 minutes, then run a knife around the sides of the cakes and unmold them. Invert and cool to room temperature right side up.
The cakes can be wrapped airtight and kept at room temperature overnight or frozen for up to 2 months.

To make the frosting:
Working with a stand mixer, preferably fitted with a paddle attachment or with a hand mixer in a large bowl, beat the cream cheese and butter together until smooth and creamy. Gradually add the sugar and continue to beat until the frosting is velvety smooth. Beat in the lemon juice or extract.
If you'd like coconut in the filling, scoop about half of the frosting and stir the coconut into this position.

To assemble the cake:
Put one layer top side up on a cardboard cake round or a cake plate protected by strips of wax or parchment paper. If you added the coconut to the frosting, use half of the coconut frosting to generously cover the first layer (or generously cover with plain frosting). Use an offset spatula or a spoon to smooth the frosting all the way to the edges of the layer. Top with the second layer, this time placing the cake stop side down, and frost with the remainder of the coconut frosting or plain frosting. Top with the last layer, right side up, and frost the top- and the sides- of the cake. Finish the top with swirls of frosting. If you want to top the cake with toasted nuts or coconut, sprinkle them on now while the frosting is soft.
Refrigerate the cake for 30 minutes, just to set the frosting before serving.

Serving:
This cake can be served as soon as the frosting is set. It can also wait, at room temperature and covered with a cake keeper overnight. The cake is best served in thick slices at room temperature and while it's good plain, it's even better with vanilla ice cream or some lemon curd.

Storing:
The cake will keep at room temperature for 2 to 3 days. It can also be frozen. Freeze it uncovered, then when it's firm, wrap airtight and freeze for up to 2 months. Defrost, still wrapped, overnight in the refrigerator.

Tuesday, April 15, 2008

Tuesdays with Dorie - Marshmallows

Photobucket

Photobucket

It was a busy, busy weekend, and I didn't get to my Tuesdays with Dorie marshmallows yet (recipe chosen by Judy, of Judy's Gross Eats), but I will soon! I picked up the ingredients this afternoon, and am going to make them within the next 24 hours. Check back for updates!

UPDATE #1: 5:04 PM - the marshmallows are made and are setting in the pan! I'll cut them up at 8:00 and we'll see how they turned out! I added some almond flavoring to give them a little oomph. They tasted great in soft, gooey form, so I can't wait to try them this evening when they're set. I didn't have parchment paper, so I lined the pan with aluminum foil and covered it liberally with corn starch. Fingers crossed!

Photobucket

Photobucket

Photobucket

UPDATE #2: 7:15 PM - we tried them! I couldn't wait three hours, and they felt set, so I went for it. They were still a little bit sticky, but they came out of the pan with no trouble. Yeah! They're really delicious!

UPDATE #3 - 8:39 PM - all done! They turned out great! I cut a couple of them into big 1.5" squares, but the rest I cut into smaller 1/2" to 1" squares. They were super easy to cut, and weren't really sticky at all, believe it or not. The knife was clean when I finished slicing all of them. Wild. Brad has already eaten a bunch of them, and I'm going to put some on the kids' hot cocoa in the morning. I was always nervous about making marshmallows before, but now that I see how early they are, I wish I had tried them sooner! What a fun recipe!

UPDATE #4: 7:51 AM - The marshmallows sat overnight under a cake dome, and they were fairly moist and sticky this morning, so I tossed them liberally with more cornstarch and powdered sugar, and put them in an airtight container. Hopefully that'll hold the stickiness at bay. And the kids loved them on their hot cocoa!

Photobucket

Marshmallows

Including marshmallows as a spoon dessert may seem like cheating -- after all, they're eaten with fingers (or, by campers, from sticks picked up in the forest) -- but making them at home is too much fun to miss. And in fact this dessert is related to others in this chapter: the base is meringue -- sweetened and strengthened by a cooked sugar syrup and fortified by gelatin.

There's nothing difficult about making the marshmallows, but the meringue does need a long beating. While you can use a hand mixer, a stand mixer makes the job easier.


Makes about 1 pound marshmallows

About 1 cup potato starch (found in the kosher foods section of supermarkets) or cornstarch
2 tablespoons light corn syrup
2 1/4-ounce packets unflavored gelatin
3 large egg whites, at room temperature
3/4 cup cold water
1 tablespoon pure vanilla extract
1 1/4 cups plus 1 tablespoon sugar

GETTING READY: Line a rimmed baking sheet -- choose one with a rim that is 1 inch high -- with parchment paper and dust the paper generously with potato starch or cornstarch. Have a candy thermometer at hand.

Put 1/3 cup of the water, 1 1/4 cups of the sugar and the corn syrup in a medium saucepan over medium heat. Bring the mixture to a boil, stirring until the sugar dissolves. Once the sugar is dissolved, continue to cook the syrup -- without stirring -- until it reaches 265 degrees F on the candy thermometer, about 10 minutes.

While the syrup is cooking, work on the gelatin and egg whites. In a microwave-safe bowl, sprinkle the gelatin over the remaining cold water (a scant 7 tablespoons) and let it sit for about 5 minutes, until it is spongy, then heat the gelatin in a microwave oven for 20 to 30 seconds to liquefy it. (Alternatively, you can dissolve the gelatin in a saucepan over low heat.)

Working in the clean, dry bowl of a stand mixer fitted with the whisk attachment or in another large bowl with a hand mixer, beat the egg whites on medium-high speed until firm but still glossy -- don't overbeat them and have them go dull.

As soon as the syrup reaches 265 degrees F, remove the pan from the heat and, with the mixer on medium speed, add the syrup, pouring it between the spinning beater(s) and the sides of the bowl. Add the gelatin and continue to beat for another 3 minutes, so that the syrup and the gelatin are fully incorporated. Beat in the vanilla.

Using a large rubber spatula, scrape the meringue mixture onto the baking sheet, laying it down close to a short end of the sheet. Then spread it into the corners and continue to spread it out, taking care to keep the height of the batter at 1 inch; you won't fill the pan. Lift the excess parchment paper up to meet the edge of the batter, then rest something against the paper so that it stays in place (I use custard cups).

Dust the top of the marshmallows with potato starch or cornstarch and let the marshmallows set in a cool, dry place. They'll need about 3 hours, but they can rest for 12 hours or more.

Once they are cool and set, cut the marshmallows with a pair of scissors or a long thin knife. Whatever you use, you'll have to rinse and dry it frequently. Have a big bowl with the remaining potato starch or cornstarch at hand and cut the marshmallows as you'd like -- into squares, rectangles or even strips (as they're cut in France). As each piece is cut, drop it into the bowl. When you've got 4 or 5 marshmallows in the bowl, reach in with your fingers and turn the marshmallows to coat them with starch, then, one by one, toss the marshmallows from one hand to the other to shake off the excess starch; transfer them to a serving bowl. Cut and coat the rest of the batch.

SERVING: Put the marshmallows out and let everyone nibble as they wish. Sometimes I fill a tall glass vase with the marshmallows and put it in the center of the table -- it never fails to make friends smile. You can also top hot chocolate or cold sundaes with the marshmallows.

STORING: Keep the marshmallows in a cool, dry place; don't cover them closely. Stored in this way, they will keep for about 1 week -- they might develop a little crust on the outside or they might get a little firmer on the inside, but they'll still be very good.

Photobucket

Tuesday, April 8, 2008

Tuesdays with Dorie - The Most Extraordinary French Lemon Cream Tart

Photobucket

It's time again for Tuesdays with Dorie! This week's recipe was chosen by Mary from Starting From Scratch. I was really excited about this lemon tart recipe. I've only made one tart prior to this (a yummy cranberry tart for Christmas 2005), and my tart pan has been sitting in my cupboard ever since, lonely and longing to be put to use again. Well, wait no longer, little tart pan!

Photobucket

The tart was fairly easy to make, though I did have a few small complications. First was the lemon cream filling. I don't know if there was something wrong with my thermometer, but after something like 30 minutes over the simmering (and at some points, full-on boiling) water, it never did reach 180 degrees. What the hell??? I finally just gave up at 165 degrees and took it off the heat. Does anyone have tips for checking the calibration of my thermometer? it's a digital, and I've never had problems with it before, but I have to wonder about it's accuracy after this recipe. Or maybe it's just me. I tried making lemon curd back in the mid-90s, and it never got to temperature, either. Hmmmm.

But I'm not upset, because the filling tastes fab. u. lous. It was all Brad and I could do to not dig in with a spoon and just eat it by itself. But we were good, and I covered it with plastic and stuck it in the fridge.

[UPDATE: I just realized while looking through the recipe that I only used 2 sticks of butter in the filling, and not the additional 5 Tbsp it calls for. FYI, it tastes glorious and the texture is just fine even without the extra butter, so feel free to leave it out if you make this tart. You could probably even get by with less than 2 sticks, in all honesty.]

Yellow is my favorite color, so I couldn't resist snapping a picture of all those gorgeous yellow ingredients!

Photobucket

I prepared the crust Saturday night after we got back from the football game. It came together really easily in my food processor, and pressed neatly into the tart pan. I was skeptical of the instructions to butter foil and press it against the dough, but I did it anyway. And yeah, when I VERY CAREFULLY removed the foil as directed, it peeled up half the dough with it. Nooooooo! I was ticked, let me tell you. I managed to piece it back together, and used some of the held back scraps to patch the rest, but I'm still annoyed that it came to that. Why not just bake it without the foil pressed so tightly against it? I don't get it.

But at least it turned out in the end! I decorated mine with thin lemon slice halves around the edge, and to be honest, I'm almost ridiculously pleased with how pretty it is. And it's just as delicious as it is beautiful! The filling is fairly tart, which I love, so the sweet pastry crust provides a great balance. This is definitely something I'll make again. In fact, I'm going to be preparing the food for an upcoming bridal shower, and I think this will have to be featured on that menu.

Photobucket

The Most Extraordinary French Lemon Cream Tart
From Baking: From My Home to Yours

1 cup sugar
Grated zest of 3 lemons
4 large eggs
3/4 cup fresh lemon juice (from 4-5 lemons)
2 sticks plus 5 tbsp unsalted butter, cut into tablespoon-size pieces, at room temperature
1 9-inch tart shell (recipe below)

Have an instant-read thermometer, a strainer and a blender or food processor at hand. Bring a few inches of water to a simmer in a saucepan.

Put the sugar and zest in a large heatproof bowl that can be set over the pan of simmering water. Off the heat, rub the sugar and zest together between your fingers until the sugar is moist, grainy and very aromatic. Whisk in the eggs, followed by the lemon juice.

Set the bowl over the pan and start stirring with the whisk as soon as the mixture feels tepid to the touch. Cook the lemon cream until it reaches 180 degrees F. As you whisk - you must whisk constantly to keep the eggs from scrambling - you'll see that the cream will start out light and foamy, then the bubbles will get bigger, and then, as it gets closer to 180 degrees F, it will start to thicken and the whisk will leave tracks. Heads up at this point - the tracks mean the cream is almost ready. Don't stop whisking or checking the temperature, and have patience - depending on how much heat you're giving the cream, getting to temp can take as long as 10 minutes.

As soon as it reaches 180 degrees F, remove the cream from the heat and strain it into the container of the blender (or food processor); discard the zest. Let the cream stand, stirring occasionally, until it cools to 140 degrees F, about 10 minutes.

Turn the blender to high (or turn on the processor) and, with the machine going, add the butter about 5 pieces at a time. Scrape down the sides of the container as needed as you incorporate the butter. Once the butter is in, keep the machine going - to get the perfect light, airy texture of lemon-cream dreams, you must continue to blend the cream for another 3 minutes. If your machine protests and gets a bit too hot, work in 1-minute intervals, giving the machine a little rest between beats.


Sweet Tart Dough

1 ½ cups all purpose flour
½ cup confectioners’ sugar
¼ tsp salt
1 stick plus 1 tablespoon (9 T) very cold (or frozen) unsalted butter, cut into small pieces (I used only 1 stick of butter)
1 large egg yolk

Put the flour, sugar, and salt in a food processor and pulse a couple of times to combine. Scatter the pieces of butter over the dry ingredients and pulse until the butter is coarsely cut in- you should have some pieces the size of oatmeal fakes and others the size of peas. Stir the yolk, just to break it up, and add it a little at a time, pulsing after each addition. When the egg is in, process in long pulses- about 10 seconds each- until the dough, which will look granular soon after the egg is added, forms clumps and curds. Just before you reach this stage, the sound of the machine working the dough will change- heads up. Turn the dough out onto a work surface and, very lightly and sparingly, knead the dough just to incorporate and dry ingredients that might have escaped mixing.

To press the dough into the pan: butter a 9-inch fluted tart pan with a removable bottom. Press the dough evenly over the bottom and up the sides of the pan, using all but one little piece of dough, which you should save in the refrigerator to patch any cracks after the crust is baked. Don’t be too heavy handed- press the crust in so that the edges of the pieces cling to one another, but not so hard that the crust loses its crumbly texture. Freeze the crust for at least 30 minutes, preferable longer, before baking.

To partially or fully bake the crust: center a rack in the center of the oven and preheat to 375 degrees F.

Butter the shiny side of aluminum foil and fit the foil, buttered side down, against the crust. (since you froze it, you can bake it without weights). Put the tart pan on a baking sheet and bake the crust for 25 minutes. Carefully remove the foil. If the crust has puffed, carefully press it down with the back of a spoon. For partially baked crust, patch the crust if necessary, then transfer the crust to a cooling rack. To fully bake the crust, bake for another 8 minutes or so, or until it is firm and golden brown. Transfer pan to a rack and cool the crust to room temperature before filling.

Pour the cream into a container, press a piece of plastic wrap against the surface to create an airtight seal and refrigerate for at least 4 hours or overnight. The cream will keep in the fridge for 4 days or, tightly sealed, in the freezer for up to 2 months; thaw it overnight in the refrigerator).

When you are ready to assemble the tart, just whisk the cream to loosen it and spoon it into the tart shell. Serve the tart, or refrigerate until needed.

Tuesday, April 1, 2008

Tuesdays with Dorie - Gooey Chocolate Cakes

This week is my first Tuesdays with Dorie recipe, Gooey Chocolate Cakes, chosen by Leigh of Lemon Tartlet! I joined the group last week, and have been so excited to take part in the fun!

Photobucket

The cakes were fairly simple, and very quick to mix up, but I did have a few small complications with the recipe. First, the only muffin pan I have is a stoneware piece, which typically requires the baking time to be extended by 4 or 5 minutes. These cakes cook so quickly, though, and are supposed to be gooey inside, so it was hard to know how long to bake them. I ended up extending the cooking time by 3 minutes, which turned out to be a little too long. The cakes were somewhat gooey inside, but I was hoping for a more molten texture.

The other issue I had was in regards to greasing and flouring the muffin cups. My stoneware is pretty well seasoned, such that most muffins and cupcakes just pop right out, and I should have just stuck with that. But I hated the thought that they might not turn out neatly after baking, so I greased and floured them as directed. Yeah. When I turned the cakes out of the pan, they were all white from the flour! Who wants that??? Grrrr. I dusted them with a powdered sugar-cocoa powder mixture to make them more attractive, so it wasn't a disaster or anything. Next time I will probably forego the greasing and flouring, and just trust my stoneware to let go of the cakes when it's time.

I'm wondering what others' experiences were with the flouring. I just barely sprayed mine with cooking spray, and then floured them lightly. Did I do something wrong?

Anyway, they tasted fabulous, and were enjoyed by all. The kids, who were already in bed, came creeping out saying "something smells like dessert." Hee hee hee! We let them have a little bite, then sent them back to re-brush their teeth before returning to bed, and then today they're having the leftovers for an after school snack. I figured they'd be way too rich for little girls (5 and 9), but they loved them!

All in all, the recipe was a success, and I will definitely make them again!

Gooey Chocolate Cakes

1/3 cup all-purpose flour
3 tablespoons unsweetened cocoa powder
¼ teaspoon salt
5 ounces bittersweet chocolate -- 4 ounces coarsely chopped and 1 ounce very finely chopped
1 stick (8 tablespoons) unsalted butter, cut into 8 pieces
2 large eggs, at room temperature
1 large egg yolk, at room temperature
6 tablespoons of sugar

Getting ready: Center a rack in the oven and preheat the oven to 400 degrees F. butter (or spray – it’s easier) 6 cups of a regular-size muffin pan, preferably a disposable aluminum foil pan, dust the insides with flour and tap out the excess. Put the muffin pan on a baking sheet.

Sift the flour, cocoa and salt together.

Set a heatproof bowl over a saucepan of gently simmering water, put the coarsely chopped chocolate and the butter in the bowl and stir occasionally over the simmering water just until they are melted – you don’t want them to get so hot that the butter separates. Remove the bowl from the pan of water.

In a large bowl, whisk the eggs and yolk until homogenous. Add the sugar and whisk until well blended, about 2 minutes. Add the dry ingredients and, still using the whisk, stir (don’t beat) them into the eggs. Little by little, and using a light hand, stir in the melted chocolate and butter. Divide the batter evenly among the muffin cups and sprinkle the finely chopped chocolate over the batter.

Bake the cakes for 13 minutes. Transfer them, still on the baking sheet, to a rack to cool for 3 minutes. (There is no way to test that these cakes are properly baked, because the inside remains liquid.)

Line a cutting board with a silicone baking mat or parchment or wax paper, and, after the 3-minute rest, unmold the cakes onto the board. Use a wide metal spatula to lift the cakes onto dessert plates.

Photobucket

Photobucket

Photobucket

Photobucket

Photobucket

Photobucket

Photobucket

Photobucket