
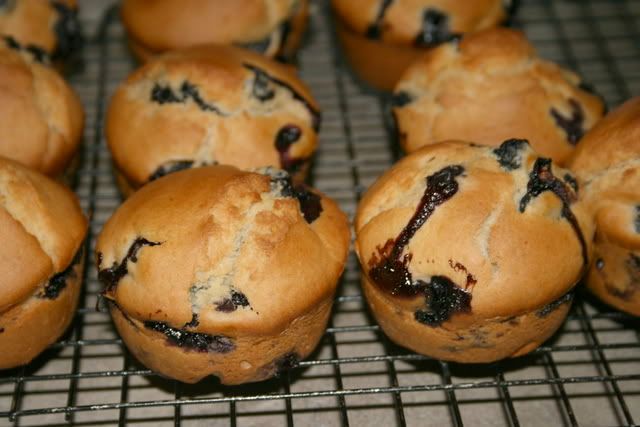
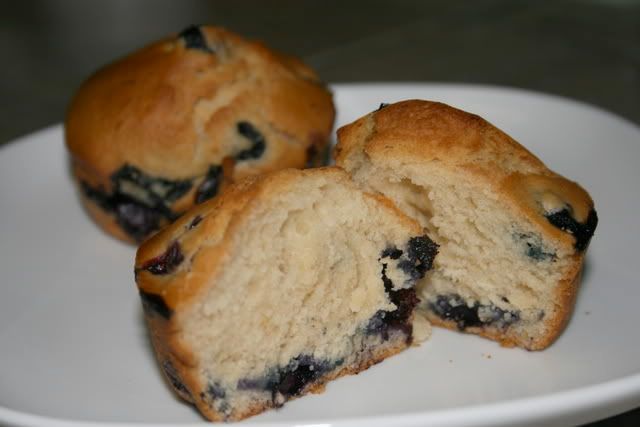
I've been plagued with insomnia lately, much to my chagrin. I'm not a good sleeper to begin with, and have always woken up frequently throughout the night, then fallen right back to sleep. But these past few days I just lie there, desperately tired and desperately trying to fall asleep, to no avail. It's unspeakably frustrating.
Today, though, I decided to make the most of it, and get up and make blueberry muffins for breakfast before the kids leave for school. I love muffins because they only take a couple minutes to throw together, and only 20-25 minutes to bake. School here doesn't start until 9:00AM, so I don't even have to get up too early in order to have them ready for a hot, tasty breakfast before the kids dart off to school. Muffins rock!
I found this basic recipe on allrecipes.com, and modified it a bit to my liking. They hit the spot!
Blueberry Muffins
1 1/2 cups all-purpose flour
3/4 cup white sugar
1/2 teaspoon salt
2 teaspoons baking powder
1/3 cup vegetable oil
1 egg
1/2 cup milk
1 cup canned blueberries, drained and rinsed well
Preheat oven to 400. Grease muffin cups or line with muffin liners.
Combine flour, cup sugar, salt and baking powder in a large bowl. In a small bowl, whisk together vegetable oil, egg and milk. Add wet ingredients to dry, stirring just until dry ingredients are moistened. Don't overmix. Fold in blueberries. Distribute batter evenly among 12 muffin cups.
Bake for 20 to 25 minutes, or until done.
Showing posts with label breakfast. Show all posts
Showing posts with label breakfast. Show all posts
Thursday, May 6, 2010
Monday, May 3, 2010
Breakfast Pizza
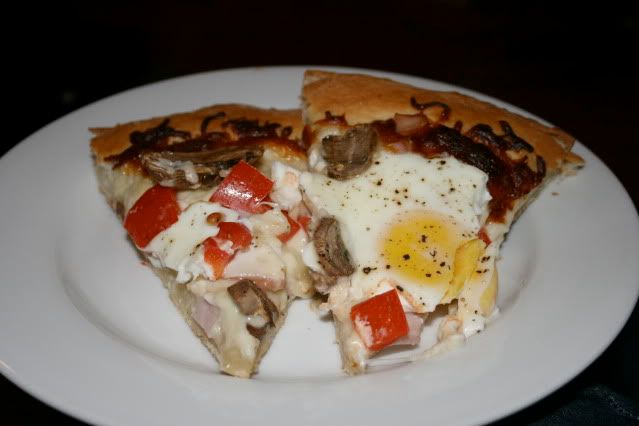
I saw this recipe on Smitten Kitchen awhile back, and have been dying to try it ever since. Pizza is one of those things I'm reluctant to make unless there's someone else to help me eat it, and with Brad gone...well, that just doesn't happen too often. On pizza night, I typically make a double batch of dough...enough to make one full-sized pizza and two or three mini pizzas for the kiddos, but when Brad's deployed, that's just too much pizza for the three of us. Perhaps I could solve that problem by not making a double batch, but I'm one of those people who tends to get stuck in the "this is the way we do it because it's the way we've always done it" kind of ruts, and this is what it gets me.
But lucky me! My friend Cheryl (yes, we have the same name) is visiting this week, and this gives me the perfect opportunity to have pizza tonight while still sticking to my double-the-recipe pizza night formula. The kiddos had one mini pizza with canadian bacon and pineapple and one with pepperoni, which left half the batch of dough for The Cheryls to try out Smitten Kitchen's breakfast pizza! Hooray!
I used my favorite go-to pizza dough recipe, then glazed it with olive oil, then topped it with mozzarella cheese, canadian bacon, mushroom, red bell pepper and 4 eggs. It baked at 420 for 30 minutes.
Were I to do this again, I would only bake it for the standard 20 minutes that I usually bake pizza, because the eggs didn't have runny yolks like I had hoped, they were more like hard boiled eggs. I checked it after 20 minutes, however, and was afraid that the eggs were still raw, but next time I think 20 minutes would have done it. 25 minutes, tops. I'll definitely try this recipe again, and give the whole single batch recipe thing a try. What can I say? I'm still learning to cook for 3, not 4. I'll get it right next time.
Breakfast Pizza
1 batch pizza dough
2 Tbsp olive oil
2 cups shredded mozzarella cheese
4 slices canadian bacon, coarsely diced
1 cup sliced mushrooms
1/2 red bell pepper, diced
4 large eggs
salt & pepper
Preheat oven to 420. Prepare pizza dough and pat onto pizza pan. Drizzle with olive oil and spread to coat evenly. Cover with cheese, and evenly distribute bacon, mushrooms and bell pepper, leaving room for 4 eggs. Crack eggs directly onto pizza, and sprinkle with salt and pepper. Bake at 420 for 20-25 minutes, or until egg whites are just set and yolks are still slightly runny. Serve warm.
Yield: 1 large pizza
Saturday, July 26, 2008
Cheesy Scrambled Eggs
The kids wanted to cook breakfast this morning, so Lydia browsed through her many cookbooks for kids, and settled on Cheesy Scrambled Eggs with fun-shaped toast.

The kids did this all by themselves, and I'm very proud of them. Lydia still needs to focus more and pay better attention to the recipe instructions, but she's definitely showing improvement!
They spread their toast with some mayhaw jelly that Brad's cousin Emily gave us for Christmas. I've only ever seen it around here, but if you can find it in your area, it's delicious! It has a nice, mild, mellow flavor, and the best I can compare it to is the pomegranate jelly my mom used to make when we lived in Spain. There were several pomegranate trees on base, growing wild, and we could pick a bunch of 10-gallon pickle buckets' full for free. Imagine how much that would cost at the store. Yikes! Anyway, the mayhaw jelly has a similar flavor to pomegranate jelly, and is so good on toast.
I had more leftover Thai Tofu Wraps from last night, since the eggs obviously weren't vegan, but the girls loved them!
Here's Miss Meg, proudly sporting her Monkeywoman t-shirt from Mary. Please forgive the bedhead, since this was Saturday breakfast, and we're being lazy this morning.
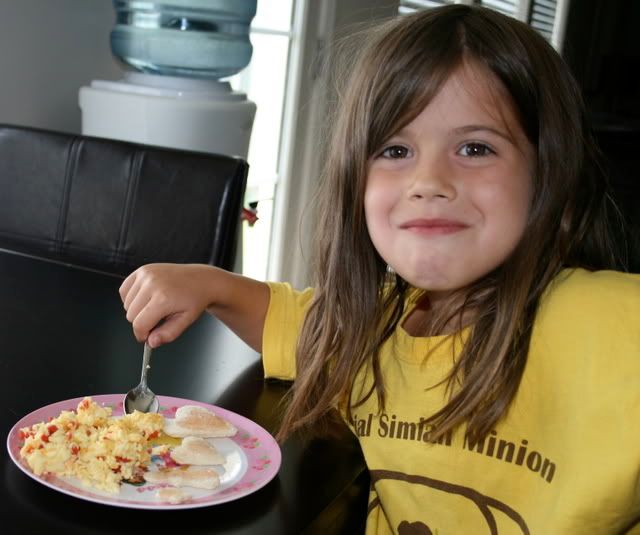
And Lydia gives the breakfast a thumbs up!

Cheesy Scrambled Eggs
3 eggs
3 Tbsp milk
1 tsp margarine
1/4 cup shredded cheddar cheese
bacon bits, if desired (we used Bacos)
Whisk together the eggs and milk. Melt margarine in a skillet over medium heat. When the margarine is melted and bubbling, add the eggs. Leave them alone for 1 minute, then stir gently until the eggs are scrambled and set. Remove from heat, add the cheese, and stir until the cheese is melted. Add bacon bits, if desired, and serve immediately.
Tuesday, June 17, 2008
Vegan Blueberry Muffins
I promised my co-workers that I'd bring in some goodies, so I whipped up a batch of blueberry muffins to bring in tomorrow. It was also a good excuse to try a vegan muffin recipe.
I made some regular muffins, and some mini muffins. Because, come on, miniature food is just cool.

These were good, but it was my first time cooking with blue agave nectar, and I think next time I'd increase it to 3/4 cup. These weren't very sweet, which on one hand was kind of refreshing, but on the other hand, was a little disappointing.
Vegan Blueberry Muffins
3 cups flour
4 tsp baking powder
1 tsp salt
1/2 cup blue agave nectar
1 cup soy, almond or rice milk
1/3 cup vegetable oil
2 cups fresh or frozen blueberries
Preheat oven to 400. Grease a muffin pan with cooking spray.
In a large mixing bowl, combine flour, baking powder and salt. In a large measuring cup, combine agave nectar, milk and oil. Whisk together to mix thoroughly. Add wet ingredients to dry ingredients. Stir just until dry ingredients are moistened. Do not over-mix. Gently fold in blueberries.
Fill muffin cups to 3/4 full. Bake 20 to 25 minutes for standard muffins, or 10 to 12 minutes for mini muffins.

Sunday, June 15, 2008
Vegan Pancakes
Lydia wanted to make breakfast this morning, so she chose the pancakes recipe from her Strawberry Shortcake cookbook (that cookbook may sound cheesy, but the recipes we've made -- macaroni & cheese, spaghetti sauce, vegetable soup, and more -- have all been surprisingly good!). The pancakes recipe sounded good enough, but I didn't want to use eggs, so Lydia got online and searched for vegan substitutes. She came up with 2 Tbsp of cornstarch for each egg, so we set off to give it a try.
It worked! I'll admit I was skeptical, but it really did work! Woohoo!
We tweaked the recipe somewhat, using blue agave nectar instead of sugar, and adding some cinnamon. Lydia did a good job cooking, although she definitely needs to learn to take more time to read the instructions. She ends up getting ahead of herself and skipping portions of steps, or even entire ones. But she's learning!
You could do a lot of things with this basic recipe. Stir in some grated apple, mashed banana, or berries; add some chopped nuts; replace half the all-purpose flour with whole-wheat flour; or whatever strikes your fancy. Yum!
Vegan Pancakes
2 cups all-purpose flour
1 tsp salt
1/2 tsp cinnamon
5 tsp baking powder
4 Tbsp cornstarch
2 cups soy milk
3 Tbsp vegan margarine, melted
3 Tbsp blue agave nectar
Whisk together flour, salt, cinnamon, baking powder and cornstarch in a large mixing bowl. In a medium mixing bowl, combine soy milk, margarine and blue agave nectar. Add soy milk mixture to dry ingredients, and whisk to combine thoroughly.
Heat a skillet or griddle to medium-high heat, spray with cooking spray, and pour the batter in 1/2-cup portions. When bubbles break on the surface and hold their shape, flip pancakes. Cook an additional minute on the other side, then remove to a plate, and serve.
It worked! I'll admit I was skeptical, but it really did work! Woohoo!

We tweaked the recipe somewhat, using blue agave nectar instead of sugar, and adding some cinnamon. Lydia did a good job cooking, although she definitely needs to learn to take more time to read the instructions. She ends up getting ahead of herself and skipping portions of steps, or even entire ones. But she's learning!
You could do a lot of things with this basic recipe. Stir in some grated apple, mashed banana, or berries; add some chopped nuts; replace half the all-purpose flour with whole-wheat flour; or whatever strikes your fancy. Yum!


Vegan Pancakes
2 cups all-purpose flour
1 tsp salt
1/2 tsp cinnamon
5 tsp baking powder
4 Tbsp cornstarch
2 cups soy milk
3 Tbsp vegan margarine, melted
3 Tbsp blue agave nectar
Whisk together flour, salt, cinnamon, baking powder and cornstarch in a large mixing bowl. In a medium mixing bowl, combine soy milk, margarine and blue agave nectar. Add soy milk mixture to dry ingredients, and whisk to combine thoroughly.
Heat a skillet or griddle to medium-high heat, spray with cooking spray, and pour the batter in 1/2-cup portions. When bubbles break on the surface and hold their shape, flip pancakes. Cook an additional minute on the other side, then remove to a plate, and serve.
Tuesday, May 13, 2008
Pannekake - Norwegian Pancakes

Last night we went over to my Mother-in-law's house, and helped Brad's 13 year old brother make Norwegian pancakes, pannekake, for a class project. They had to pick a food from their family heritage, do a write-up about it, then prepare it and bring it to school for everyone to try.
Both Brad and I are Norwegian by heritage (at least partially), which is pretty cool considering that we're from completely different regions of the U.S. I haven't had much Norwegian food, and in fact I hadn't even heard of pannekake before, so I was excited to get to help out.
We used a recipe that Brad's great-grandmother used to make, just a few simple ingredients. They were really easy to cook, and even Brad's brother was able to take over after we showed him how to make a few. I told him that chicks dig guys who can cook. ; )
These were so delicious last night, so I got up early this morning and made a batch of them for the kids before school. I rolled mine up with strawberry jam, and they were sooooo yummy! I wish we had picked up some lingonberries last time we were at IKEA.


Pannekake
6 eggs
2 cups half-and-half or whole milk
2 cups flour
1/2 tsp salt
1/2 tsp sugar
Whisk eggs and milk together, then whisk in dry ingredients. The batter will be thinner than a pancake batter, and there will be a few lumps.
Heat a crepe pan over medium-low heat. Grease with cooking spray, then add a scant quarter cup of batter to the pan, swirling to spread it evenly across the bottom. Cook for about one minute, until the top is mostly dry. Flip over and cook about 30 seconds on the other side. Remove to a plate, and continue with remaining batter.
Serve these rolled up with lingonberries and cream, jam, or syrup.
Saturday, May 3, 2008
Pumpkin Oat Muffins

The kids and I made these pumpkin oat muffins for breakfast this morning. They were, like most muffin recipes, very quick to mix up and stick in the oven. I tweaked the recipe a bit because I didn't have a couple things it called for, but they still turned out well, and it was fun to cook with the kids!
I don't usually care for oats in muffins. I think it makes them too dense and chunky, but it works really well in these. The oats just disappear into the muffin, and you can't even tell they're there, but it's great to sneak in their health benefits where you can. The muffins are hearty and filling, but not dense.

These would also be good if you substituted chocolate chips for the raisins, but I was shooting for something a little healthier today. ; )
Pumpkin Oat Muffins
Modified from Sesame Street: C is for Cooking cookbook
1 1/2 cups all-purpose flour
2 tsp baking powder
1/2 tsp baking soda
1/4 tsp salt
1/2 tsp cinnamon
1/2 tsp cloves
1/2 tsp allspice
1 egg
2/3 cup packed brown sugar
1/4 cup vegetable oil
1/2 cup canned pumpkin
1/4 cup fat-free sour cream
1/4 cup low-fat ricotta cheese
1 cup uncooked oatmeal
1/2 cup raisins
Preheat oven to 350. Grease 12 muffin cups.
Whisk together dry ingredients, except for oatmeal and raisins, in a small bowl. Whisk together wet ingredients in a large bowl. Add dry ingredients to wet ingredients, stirring just until dry ingredients are moistened. Gently stir in the oatmeal and raisins, just until incorporated.
Divide batter among muffin cups. They will be slightly more than 3/4 full. Bake at 350 for 25 minutes, or until a toothpick inserted in the center comes out clean. Remove to a cooling rack.
Store in a covered container for up to 3 days.

Sunday, April 13, 2008
The Best Cinnamon Rolls in the World!
No, seriously.
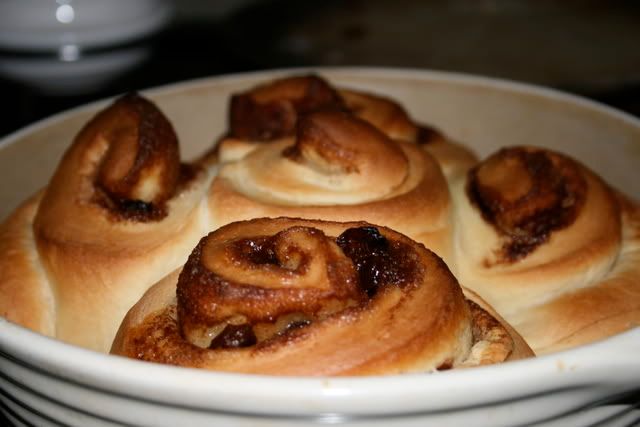
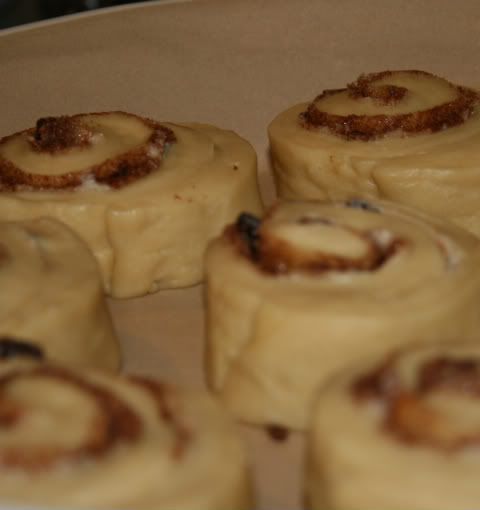
I made a variation of these cinnamon rolls from Joy the Baker this evening, and let me just say WOW. These were by far the best cinnamon rolls I've ever made, perhaps even the best I've ever had -- and that's saying a lot. The dough was beautiful. I mean, really, really, really gorgeous. It came together so easily, and rose like you wouldn't believe.
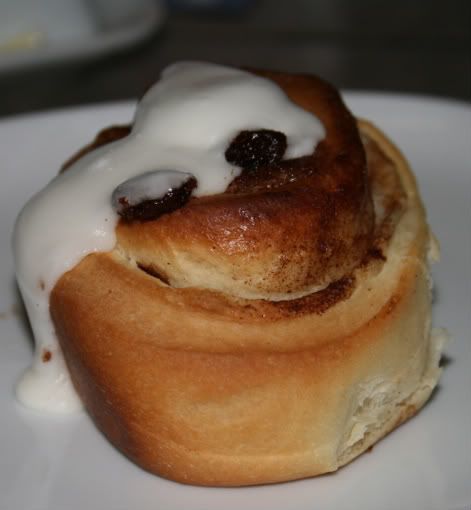
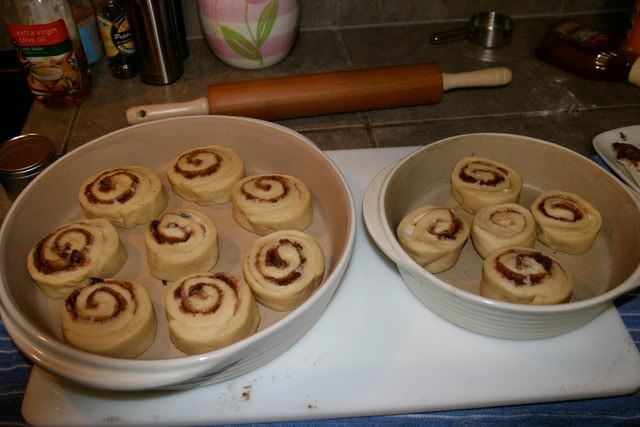
I made two pans, one large and one small. The large pan went into the fridge after the final rising, and will bake in the morning for breakfast. The small pan I baked tonight, and Brad and I had them for a late pseudo-dinner. They were delicious, and I can't wait to have more for breakfast in the morning.
Before baking:
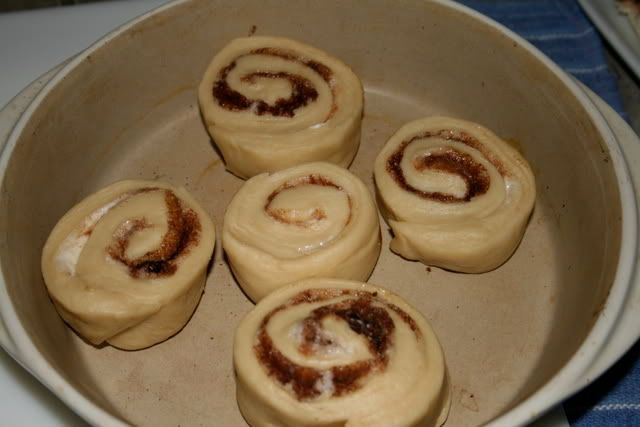
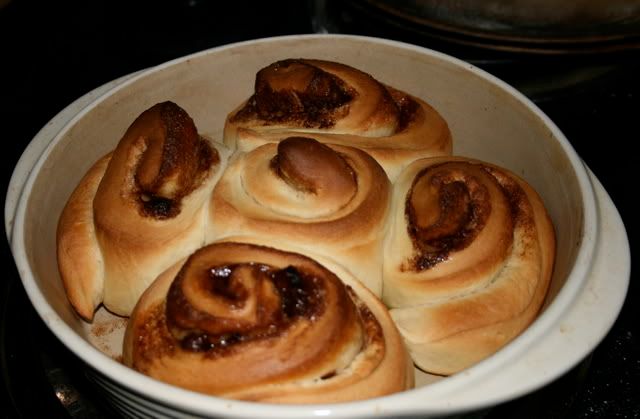
And after!
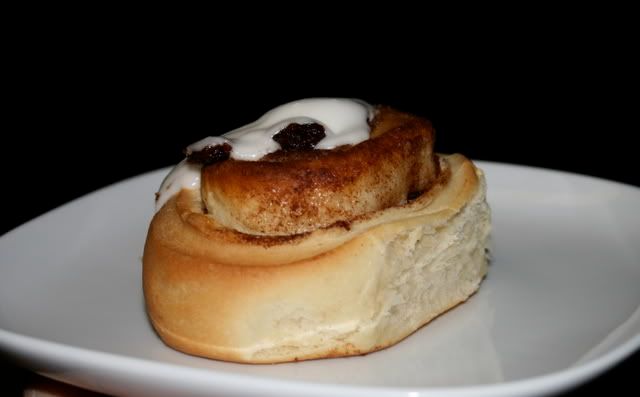
Here's the recipe I used, with my changes included. For the original recipe, be sure to check out Joy's recipe here. My changes were pretty simple. I left out the spices and lemon zest in the dough, and then when I rolled it out, I spread it with softened butter, and sprinkled it with cinnamon, sugar and raisins. For the glaze, I just used a simple butter/powdered sugar/milk glaze. Joy's rolls would obviously have a much more complex flavor than mine, with all those yummy spices and lemon zest. Either way, you can't go wrong! : )
Cinnamon Rolls
Sponge:
2 1/2 teaspoons instant yeast
1/2 cup bread flour
2/3 cup whole milk, cold
4 teaspoons honey
Final dough:
1 cup bread flour
1 1/2 cup all purpose flour
3/4 teaspoon salt
6 Tablespoons butter, cold
1/4 cup sugar
2 eggs, room temperature
Filling:
1/4 cup butter, softened
1/2 cup sugar
2 tsp cinnamon
Frosting:
1 1/2 cups powdered sugar
1 Tbsp butter, softened
1 to 2 Tbsp milk
Mix the sponge: In a medium bowl combine all of the dry ingredients followed lastly by the milk. Stir together for 2 minutes, then cover with the flours, then the salt from the final dough. The flours are used on top of the sponge like a covering of plastic wrap. Allow to ferment at room temperature for 20 minutes.
Begin the final dough: While the sponge is fermenting, in a 4-qt mixing bowl fitted with a paddle attachment, cream the butter of medium speed until smooth and pale. Add the sugar and continue creaming at the same speed for 5 minutes. It should be light and fluffy. Add the eggs in 4 additions, mix until combined. The mixture will look very wet, and curdled. This is a lot of eggs, for the amount of butter; it won’t be completely incorporated. Don’t worry!
Add the flour covered sponge to the butter mixture. Mix on low speed until evenly combined. On medium speed, continue to mix with the paddle attachment for 2 minutes. Switch to the dough hook and mix on low speed until smooth and satiny. If the dough is sticking a lot to the sides of the bowl, add all purpose flour 1 Tablespoon at a time. Stop the mixer occasionally to scrape the dough off the bottom of the bowl. Mixing with the dough hook takes about 5 minutes. You can finish with a minute or two of hand kneading if you like.
Place the dough in a lightly greased bowl. Place a clean dish towel over the bowl. Bulk ferment at room temperature for 1 1/2 hours.
Flip the dough out of the bowl onto a lightly floured surface to fold the dough and redistribute the yeast. With a floured hand, pat the dough roughly into a rectangle. Lift the left side of the dough and fold it over almost to the right side of the dough, leaving about 2 inches of room. Lift the right side and fold it all the way over to the left. Lift the bottom of the dough, the side closest to you, and fold it almost to the top of the dough, leaving about an inch. Lastly, fold the top of the dough all the way down towards you. Return the dough to the bowl and cover as before, leaving it for 30 minutes.
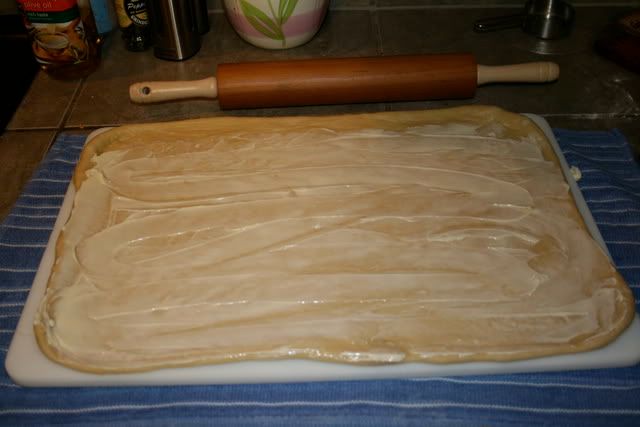
On a lightly floured work surface, using a rolling pin, degas and roll the dough out to a rectangle 15 inches high and 12 inches long.
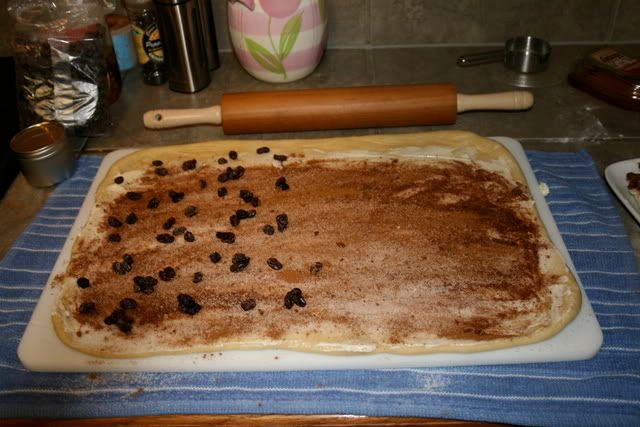
Spread with the softened butter, and sprinkle evenly with the sugar, and then cinnamon. Add raisins, if desired. Beginning with the long edge, roll up the dough and cinnamon sugar filling. Brush the edge of the seam with water and pinch closed. Cover with a towel and let rest for 5 minutes. Meanwhile, preheat the oven to 375 degrees F.
Using a bench knife, or sharp kitchen knife, slice the dough into 1 inch cinnamon rolls. Place cinnamon rolls into a baking pan, leaving about 1 inch of space between. Cover the sliced cinnamon rolls with a towel and allow to rest and almost double in size, about 50 minutes. If the room is very warm from the oven, they will proof in as little as 35 minutes.
For the glaze, stir together butter, powdered sugar and milk with a fork; set aside.
Bake for 10-15 minutes, keeping an eye on them after 10 minutes, until they are a lovely golden brown. Remove from the oven and drizzle with glaze while still warm.

I made a variation of these cinnamon rolls from Joy the Baker this evening, and let me just say WOW. These were by far the best cinnamon rolls I've ever made, perhaps even the best I've ever had -- and that's saying a lot. The dough was beautiful. I mean, really, really, really gorgeous. It came together so easily, and rose like you wouldn't believe.

I made two pans, one large and one small. The large pan went into the fridge after the final rising, and will bake in the morning for breakfast. The small pan I baked tonight, and Brad and I had them for a late pseudo-dinner. They were delicious, and I can't wait to have more for breakfast in the morning.


Before baking:

And after!


Here's the recipe I used, with my changes included. For the original recipe, be sure to check out Joy's recipe here. My changes were pretty simple. I left out the spices and lemon zest in the dough, and then when I rolled it out, I spread it with softened butter, and sprinkled it with cinnamon, sugar and raisins. For the glaze, I just used a simple butter/powdered sugar/milk glaze. Joy's rolls would obviously have a much more complex flavor than mine, with all those yummy spices and lemon zest. Either way, you can't go wrong! : )
Cinnamon Rolls
Sponge:
2 1/2 teaspoons instant yeast
1/2 cup bread flour
2/3 cup whole milk, cold
4 teaspoons honey
Final dough:
1 cup bread flour
1 1/2 cup all purpose flour
3/4 teaspoon salt
6 Tablespoons butter, cold
1/4 cup sugar
2 eggs, room temperature
Filling:
1/4 cup butter, softened
1/2 cup sugar
2 tsp cinnamon
Frosting:
1 1/2 cups powdered sugar
1 Tbsp butter, softened
1 to 2 Tbsp milk
Mix the sponge: In a medium bowl combine all of the dry ingredients followed lastly by the milk. Stir together for 2 minutes, then cover with the flours, then the salt from the final dough. The flours are used on top of the sponge like a covering of plastic wrap. Allow to ferment at room temperature for 20 minutes.
Begin the final dough: While the sponge is fermenting, in a 4-qt mixing bowl fitted with a paddle attachment, cream the butter of medium speed until smooth and pale. Add the sugar and continue creaming at the same speed for 5 minutes. It should be light and fluffy. Add the eggs in 4 additions, mix until combined. The mixture will look very wet, and curdled. This is a lot of eggs, for the amount of butter; it won’t be completely incorporated. Don’t worry!
Add the flour covered sponge to the butter mixture. Mix on low speed until evenly combined. On medium speed, continue to mix with the paddle attachment for 2 minutes. Switch to the dough hook and mix on low speed until smooth and satiny. If the dough is sticking a lot to the sides of the bowl, add all purpose flour 1 Tablespoon at a time. Stop the mixer occasionally to scrape the dough off the bottom of the bowl. Mixing with the dough hook takes about 5 minutes. You can finish with a minute or two of hand kneading if you like.
Place the dough in a lightly greased bowl. Place a clean dish towel over the bowl. Bulk ferment at room temperature for 1 1/2 hours.
Flip the dough out of the bowl onto a lightly floured surface to fold the dough and redistribute the yeast. With a floured hand, pat the dough roughly into a rectangle. Lift the left side of the dough and fold it over almost to the right side of the dough, leaving about 2 inches of room. Lift the right side and fold it all the way over to the left. Lift the bottom of the dough, the side closest to you, and fold it almost to the top of the dough, leaving about an inch. Lastly, fold the top of the dough all the way down towards you. Return the dough to the bowl and cover as before, leaving it for 30 minutes.
On a lightly floured work surface, using a rolling pin, degas and roll the dough out to a rectangle 15 inches high and 12 inches long.
Spread with the softened butter, and sprinkle evenly with the sugar, and then cinnamon. Add raisins, if desired. Beginning with the long edge, roll up the dough and cinnamon sugar filling. Brush the edge of the seam with water and pinch closed. Cover with a towel and let rest for 5 minutes. Meanwhile, preheat the oven to 375 degrees F.
Using a bench knife, or sharp kitchen knife, slice the dough into 1 inch cinnamon rolls. Place cinnamon rolls into a baking pan, leaving about 1 inch of space between. Cover the sliced cinnamon rolls with a towel and allow to rest and almost double in size, about 50 minutes. If the room is very warm from the oven, they will proof in as little as 35 minutes.
For the glaze, stir together butter, powdered sugar and milk with a fork; set aside.
Bake for 10-15 minutes, keeping an eye on them after 10 minutes, until they are a lovely golden brown. Remove from the oven and drizzle with glaze while still warm.
Sunday, April 6, 2008
French Toast
Really, are there many things better than breakfast for dinner? It seems to be one of those things that everybody loves. I remember back in college how excited some people would get when the cafeteria served pancakes, French toast, bacon and eggs for dinner (that, and they also got excited about Cheese It Up night, with grilled cheese, quesadillas and tomato soup...yum!). So as you can guess, breakfast for dinner tonight totally hit the spot!
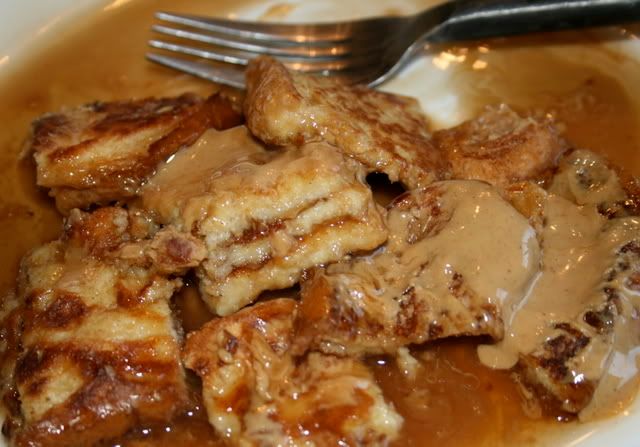
When it comes to pancakes and French toast, Brad and I are almost polar opposites. I like loads of syrup on mine, while Brad prefers there to be just the lightest amount of syrup...just enough to lend a hint of sweetness to the pancakes or French toast, but not overpowering them. When he's done eating, his plate usually only sports a drop or two of unused syrup. I, on the other hand, love my pancakes and French toast SWIMMING in syrup. And tonight I splurged on one of my very favorite things (something I don't do very often) and put peanut butter on my French toast, then topped it with syrup. OMG, YUM! That's how we usually had pancakes and French toast growing up, although Brad thinks I'm a complete freak for liking it. I think he's a freak, however, because he doesn't even like peanut butter at all, in any capacity, so his opinion about my French toast today doesn't hold much weight with me. ; )
Ahhhh, marital bliss! hee hee hee...
Here's my French toast. Doesn't it look happy, all slathered in peanut butter and swimming in syrup?
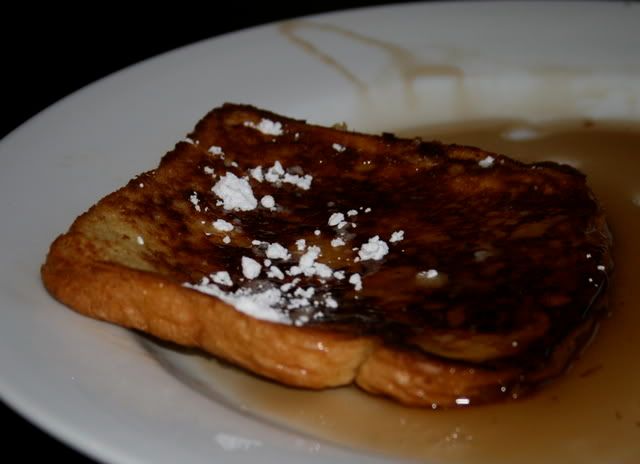
And here's Brad's French toast (with much more syrup than he usually uses). Doesn't it look sad? Doesn't it look like it feels slighted? Poor, poor French toast, sitting on the side of the pool, only able to dip its toes in the syrup, wishing it could jump in and swim with the French toast cool kids. So sad...
I take a pretty generic approach to French toast, but here's the recipe in case anyone wants it.
French Toast
4 eggs
1/2 cup milk
1 tsp vanilla
1/2 tsp cinnamon
10 slices bread
Preheat a large skillet or griddle. I don't have a griddle so I use an electric skillet because that way I can cook 6 slices at a time. If using a griddle or electric skillet, set the temperature to 375. If using a skillet on the stove, heat it to medium. Spray fairly liberally with cooking spray.
Whisk together eggs, milk, vanilla and cinnamon in a wide, shallow dish. Dip bread slices in egg mixture, one at a time, flipping to soak both sides. Don't skimp on this, as you want the egg mixture to soak into the bread. Place the bread in the heated skillet. Cook for a few minutes on each side (lift up a corner to see if it's brown enough on the bottom), then flip and continue cooking on the other side. At a temperature of 375, by the time they're nice and brown on the outside, they'll be cooked through in the middle.
Serve immediately, with lots of peanut butter and syrup. :wink:
When it comes to pancakes and French toast, Brad and I are almost polar opposites. I like loads of syrup on mine, while Brad prefers there to be just the lightest amount of syrup...just enough to lend a hint of sweetness to the pancakes or French toast, but not overpowering them. When he's done eating, his plate usually only sports a drop or two of unused syrup. I, on the other hand, love my pancakes and French toast SWIMMING in syrup. And tonight I splurged on one of my very favorite things (something I don't do very often) and put peanut butter on my French toast, then topped it with syrup. OMG, YUM! That's how we usually had pancakes and French toast growing up, although Brad thinks I'm a complete freak for liking it. I think he's a freak, however, because he doesn't even like peanut butter at all, in any capacity, so his opinion about my French toast today doesn't hold much weight with me. ; )
Ahhhh, marital bliss! hee hee hee...
Here's my French toast. Doesn't it look happy, all slathered in peanut butter and swimming in syrup?

And here's Brad's French toast (with much more syrup than he usually uses). Doesn't it look sad? Doesn't it look like it feels slighted? Poor, poor French toast, sitting on the side of the pool, only able to dip its toes in the syrup, wishing it could jump in and swim with the French toast cool kids. So sad...

I take a pretty generic approach to French toast, but here's the recipe in case anyone wants it.
French Toast
4 eggs
1/2 cup milk
1 tsp vanilla
1/2 tsp cinnamon
10 slices bread
Preheat a large skillet or griddle. I don't have a griddle so I use an electric skillet because that way I can cook 6 slices at a time. If using a griddle or electric skillet, set the temperature to 375. If using a skillet on the stove, heat it to medium. Spray fairly liberally with cooking spray.
Whisk together eggs, milk, vanilla and cinnamon in a wide, shallow dish. Dip bread slices in egg mixture, one at a time, flipping to soak both sides. Don't skimp on this, as you want the egg mixture to soak into the bread. Place the bread in the heated skillet. Cook for a few minutes on each side (lift up a corner to see if it's brown enough on the bottom), then flip and continue cooking on the other side. At a temperature of 375, by the time they're nice and brown on the outside, they'll be cooked through in the middle.
Serve immediately, with lots of peanut butter and syrup. :wink:
Saturday, April 5, 2008
Sausage, Biscuits & Gravy
Well, last week's menu was derailed midway through the week. I've not been feeling my best for the past couple days, so one day Brad picked up Raising Cain's chicken fingers for dinner (YUM!), and the next day he grabbed a frozen pizza from Target on his way home from class, and we ate that. I'm feeling somewhat better now, though, and am ready to get back on my game! Today I made the first component of the next Tuesdays with Dorie recipe: The Most Extraordinary French Lemon Cream Tart. I'll post more about it on Tuesday, so be watching for that. If the whole finished product tastes as good as this one part I made, we're in for a treat!
Now, about food we ate today. This morning, true to my declaration to get back into the kitchen, we had a full-on, no-shit Southern breakfast: sausage, biscuits, gravy and grits. OH, BABY!
We could have had some eggs with it, but eggs are healthy, and we wouldn't want them to get in the way of all that yummy, unhealthy other stuff.
I'll confess that we cheated and used frozen Pillsbury buttermilk biscuits (shut up, they are really good, and better than anything I've been able to make from scratch), and used Jimmy Dean's pre-cooked sausage patties, but I'm OK with that.
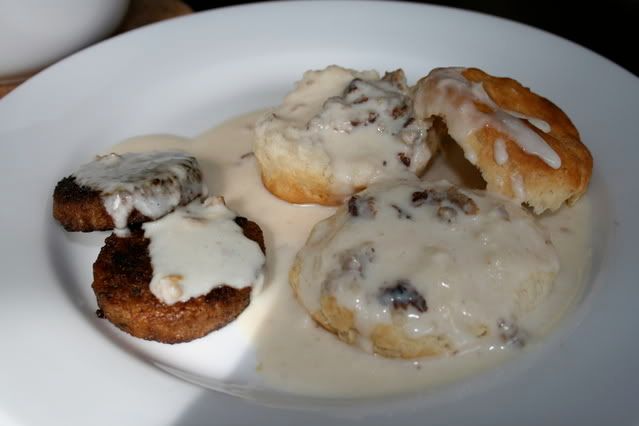
Yum yum yum yum yum yum yum yum yummmmmmmmm!
Friday, March 14, 2008
My take on tamagoyaki
I started making tamagoyaki (Japanese rolled eggs) last year when I began packing bentos for the kids, and Meg has been hooked ever since! That girl has an astonishing affinity for eggs, particularly of the hard-boiled, scrambled or omelet variety. One of her favorite things to eat is a plain egg omelet...no cheese, no meat, no veggies, just eggs. Tamagoyaki is great in that regard, because it doesn't have any filling. Traditional tamagoyaki has dashi stock, sugar, salt and soy sauce whisked into the egg before cooking. For Lydia I usually just add soy sauce and sugar, for a nice salty/sweet flavor, but Meg prefers hers with just plain eggs and nothing else.
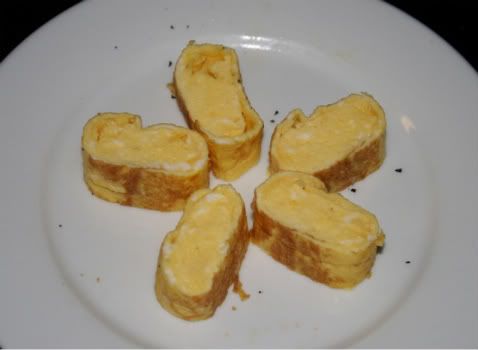
I learned to make tamagoyaki from this tutorial, and have been off and running ever since. I have a cheapo rectangle pan that I bought at the Daiso in Japan, but I've had the best luck just using a standard crepe pan.
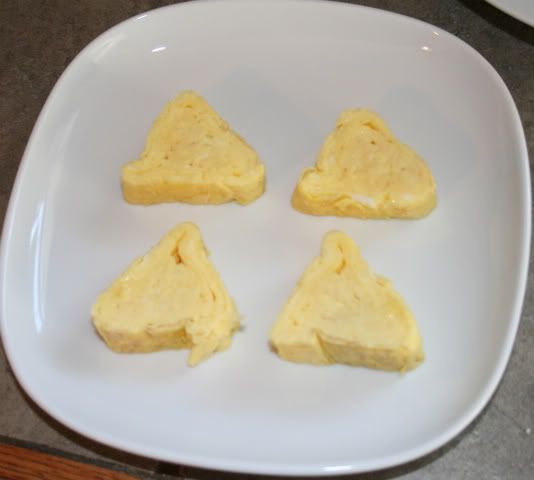
Meg asked for this for breakfast this morning, so I whipped one up. I will try to take more photos of the cooking process next time I make it, but for now, here it is: the finished product!
She likes it!

Updated: Meg requested this for breakfast again today, so I snapped a few more pictures of the process. Here's how it looks after several layers, while the last layer is cooking.
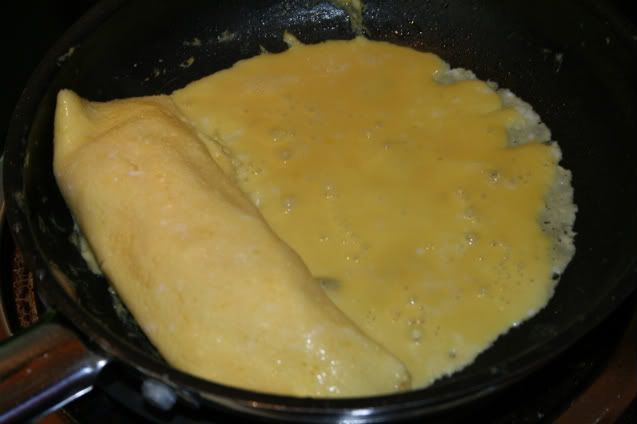
Here it is all rolled up.
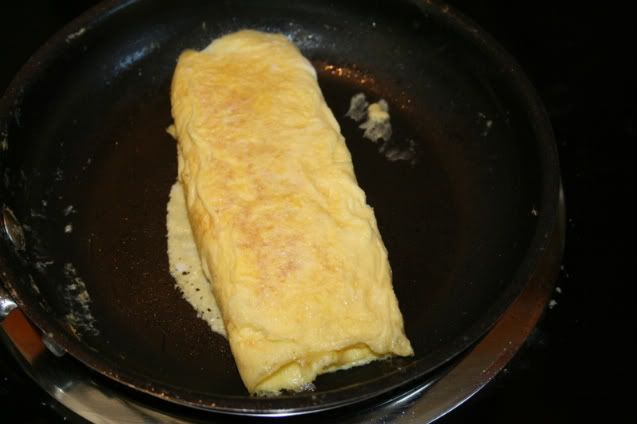
Then I used a sushi mat to shape it into a triangle, then sliced it and had time to quickly snap a picture before Meg devoured it.

I learned to make tamagoyaki from this tutorial, and have been off and running ever since. I have a cheapo rectangle pan that I bought at the Daiso in Japan, but I've had the best luck just using a standard crepe pan.
Meg asked for this for breakfast this morning, so I whipped one up. I will try to take more photos of the cooking process next time I make it, but for now, here it is: the finished product!
She likes it!

Updated: Meg requested this for breakfast again today, so I snapped a few more pictures of the process. Here's how it looks after several layers, while the last layer is cooking.

Here it is all rolled up.

Then I used a sushi mat to shape it into a triangle, then sliced it and had time to quickly snap a picture before Meg devoured it.

Monday, March 10, 2008
Apple Pie Muffins

Apple Pie Muffins
2 1/4 cups flour
1 teaspoon baking soda
1/2 teaspoon salt
1 egg
1 cup buttermilk
5 Tbsp butter, melted
1 teaspoon vanilla extract
1 cup sugar
2 cups diced apples
1/2 cup sugar
1/2 tsp cinnamon
Preheat the oven to 350. Spray a muffin pan (I made mini muffins) with cooking spray.
In a large bowl, stir together flour, baking soda and salt. In a separate smaller bowl, mix together the egg, buttermilk, melted butter, vanilla and the 1 cups of sugar. Combine wet and dry ingredients, stirring just until dry ingredients are moistened. Fold in diced apples.
Spoon batter into muffin tins, filling 3/4 full. Bake at 350 for 12-14 minutes for mini muffins, or 22-25 minutes for standard muffins.
While muffins are baking, mix together the 1/2 cup sugar and 1/2 tsp cinnamon in a small bowl; set aside.
When muffins are done, remove from the pan, and dip the tops in the cinnamon and sugar mixture.
Sunday, March 2, 2008
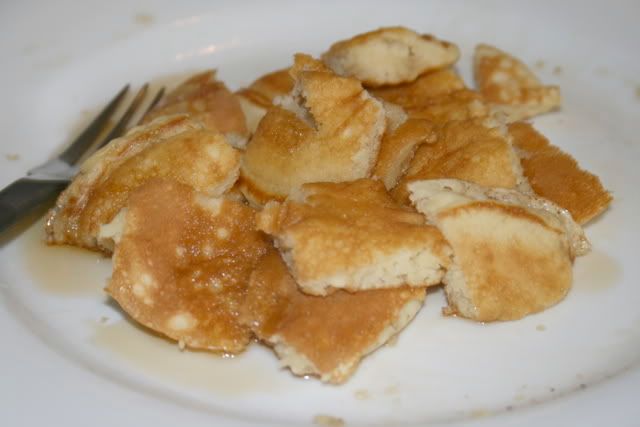
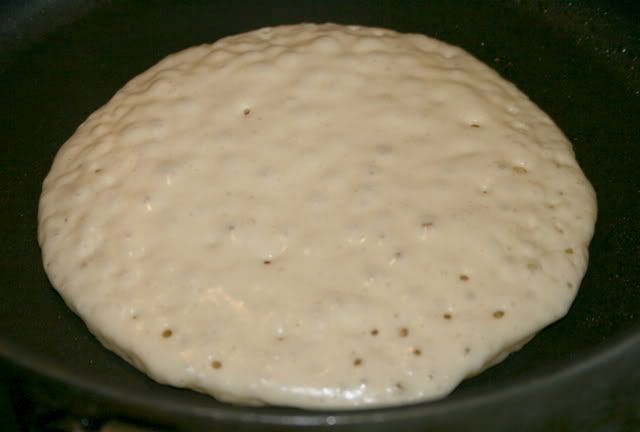
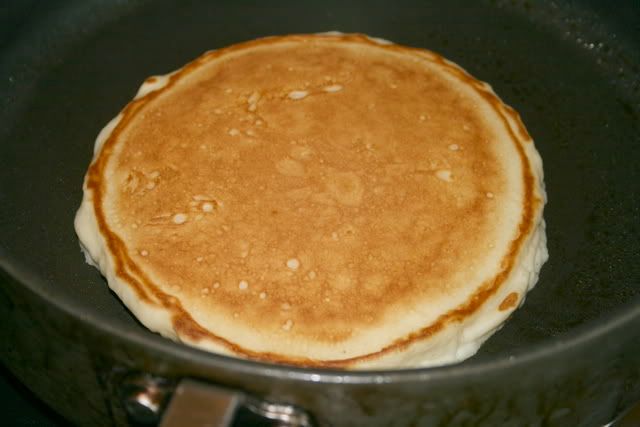
Truck-stop Buttermilk Pancakes
Best. Pancakes. Ever.
Truck-stop Buttermilk Pancakes
2 eggs
1/2 cup milk
2 tablespoons butter, melted
2 cups buttermilk
2 cups all-purpose flour
2 teaspoons baking powder
2 teaspoons baking soda
1 pinch salt (optional)
2 tablespoons sugar
In a large bowl, whisk together the eggs, milk, butter and buttermilk. Combine the flour, baking powder, baking soda and sugar; stir into the wet ingredients just until blended. Adjust the thickness of the batter to your liking by adding more flour or buttermilk if necessary.
Heat a large griddle over medium heat, and coat with cooking spray. Pour 1/4 cupfuls of batter onto the skillet, and cook until bubbles appear on the surface. Flip, and cook until browned on the other side. Continue with remaining batter.
Sunday, February 17, 2008
Banana Bread
I had some bananas that the kids didn't eat before they became over-ripe, so I just whipped up a batch of banana bread. I used this recipe, which I found online, and it should be ready in about an hour. I halved the recipe, since I only had two bananas, but I usually find that I only need one loaf of snack bread at a time, so I don't know that I'll ever make the full recipe.
I'll post an update tomorrow once I've tasted it, to give my review.
Update: It was just....eh. It got really browned on top, almost burnt, so I'm lucky I checked it after 45 minutes and put some foil on top to prevent further browning. I was also surprised to find that it was really dark inside, too. Usually banana bread has a much lighter color, so this was strange. It tastes decent, but not fantastic, so I'm still on the look-out for the perfect banana bread recipe. Any suggestions are welcome, if you know of a great one!
Banana Bread
5 very ripe bananas
4 eggs
1 cup shortening
2 1/2 cups white sugar
1 tablespoon vanilla extract
3 1/2 cups all-purpose flour
2 teaspoons baking soda
1 teaspoon salt
Preheat oven to 300. Grease two 9-inch loaf pans.
In a medium bowl, mash bananas and stir in the eggs until well blended. Add shortening, sugar and vanilla. Using an electric mixer(I used a hand-held), beat until the shortening is evenly combined.
Whisk together flour, baking soda, and salt; blend into batter. Add walnuts if desired. Divide between the prepared pans.
Bake for 1 hour 15 minutes in the preheated oven, or until a toothpick inserted into the center of the loaf comes out clean.
French Puffs
I've been meaning to make these muffins for quite awhile now, but kept putting them off on weekday mornings. Our mornings are busy enough with getting ourselves ready, getting the kids up, packing lunches, eating breakfast, and getting out of the house on time. I've made other muffins in the morning with no problem, but these have an extra step at the end, and I never know what I'll be busy with when they come out of the oven. But now it's Sunday, and we have plenty of time, so into the oven they go!
These muffins are incredible. My mom got the recipe from a friend when we lived in Spain, and they were an instant hit. They're light, fluffy, lightly sweetened muffins that are quickly dipped in butter and rolled in cinnamon & sugar as soon as they come out of the oven. Think of them as the muffin version of cinnamon toast!
To make these vegan, use egg substitute (mashed bananas or applesauce, or a commercial egg substitute), soy milk, and non-dairy margarine.
French Puffs
1 egg
¾ c milk
½ c vegetable oil
2 c flour
1/3 c sugar
3 tsp baking powder
1 tsp salt
Heat oven to 400. Grease bottoms of 12 muffin pan cups. Beat egg in large bowl. Stir in milk and oil. Stir in remaining ingredients all at once, just until flour is moistened (batter will be lumpy). Spoon into muffin cups, filling ¾ full.
Bake until golden brown, about 20 minutes.
Remove immediately from pan and roll in about ½ cup melted butter, then in mixture of ½ c sugar and 1 tsp cinnamon.
Tuesday, February 12, 2008
Chewy Granola Bars
I made these granola bars last week, as part of our ongoing effort to save money. Granola bars at the store aren't too expensive, but the cost adds up after awhile, especially considering how incredibly inexpensive and easy they are to make from scratch.
I made a double batch of these to maximize my time, and made one pan with dried cranberries and sunflower seeds, and the other batch with mini chocolate chips. The cranberry ones were hands-down the family favorite, but both were good.
Brad and I have class on Tuesdays and Thursdays, straight from 9am to 1:30pm. We leave the house at 7:15am and don't get home until about 3:00, so I've taken to packing us some quick snacks to eat in the 10 minutes as we walk between classes. I have a bento box about the size of a steno pad, with 3 divided compartments. I stick some granola bars, chunks of fruit, string cheese, hard-boiled eggs, baby carrots, and other similar foods in there, and it works out really well. If not for this, we'd either have growling tummies by the time we got home, or else we'd drop money at the Student Union for a Chick Fil-A. Either way, not a good option, so the bento box and these granola bars are saving us money and improving our quality of life. ; ) You can't beat that!
Chewy Granola Bars
4 1/2 cups rolled oats
1 cup flour
1 tsp baking soda
1 tsp vanilla
2/3 cup butter, softened
1/2 cup honey
1/4 cup packed brown sugar
1 cup dried cranberries
1/2 cup sunflower seeds
Preheat oven to 325. Lightly grease a 9 x 13 pan with Pam.
In a large mixing bowl, combine the oats, flour, baking soda, vanilla, butter, honey and brown sugar. Stir in the dried cranberries and sunflower seeds.
Lightly press mixture into the prepared pan. Bake for 18 to 22 minutes or until golden brown. Let cool for 10 minutes then cut into bars. Let bars cool completely in pan before removing or serving.
Variations: Instead of dried cranberries and sunflower seeds, use any desired ingredients. Some options are mini chocolate chips, cinnamon chips, chopped walnuts, pecans or other nuts, mini marshmallows, raisins, etc.
Potato Pancakes
We had these for dinner tonight, and they were so yummy! The kids especially liked them, and ate 3 big pancakes each, with some homemade cinnamon applesauce that I cooked up earlier this afternoon.
Potato Pancakes
2 eggs
2 tablespoons all-purpose flour
1/4 teaspoon baking powder
1/2 teaspoon salt
1/4 teaspoon pepper
6 medium potatoes, peeled and shredded
1/2 cup finely chopped onion
1/4 cup vegetable oil
In a large bowl, beat together eggs, flour, baking powder, salt, and pepper. Mix in potatoes and onion.
Heat oil in a large skillet over medium heat. Use a 1/2 cup measuring cup to scoop the potato mixture into the skillet. Press to flatten. Cook about 4 to 5 minutes on each side, until browned and crisp. Drain on paper towels.
Thursday, February 7, 2008
Candy Apple Muffins
My mom found this recipe when I was in elementary school, and they were an instant hit. I took the recipe to my Home Ec teacher in junior high, and she loved it and added it to her permanent recipe line-up for class. These really are fun muffins. They're just applesauce muffins with red hot candies stirred into the batter, and they taste delicious. Kids love them!
I threw these together this morning, right after I got out of the shower. They literally took less than 5 minutes to mix and get into the oven, and they were done baking by the time I finished getting dressed, doing my make-up and drying my hair. You can't beat that!
Candy Apple Muffins
1 3/4 cups all-purpose flour
1 Tbsp. baking powder
3/4 tsp. salt
1/3 cup granulated sugar
2 eggs, room temperature
1 cup unsweetened applesauce
1/4 cup butter, melted
1/4 cup red hots
Preheat oven to 400.
Combine wet ingredients and dry ingredients separately. Add dry ingredients to wet ingredients. Stir until just mixed. Bake for 25-30 minutes. Check often as they may cook quickly.
Sunday, February 4, 2007
Cheryl's Eggs Benedict
2 English muffins, split
2 Tbsp butter, softened
4 sliced Canadian bacon, cooked
4 poached eggs
Hollandaise sauce (below)
Prepare Hollandaise sauce. Spread cut sides of muffins with butter. Broil 3 inches from heat for 1 minute, or until lightly browned. Place a slice of Canadian bacon on each muffin half; top with poached egg, and cover with Hollandaise sauce.
Yield: 2 servings. And you don’t want to know the nutritional information. Trust me, these are worth it.
Hollandaise Sauce
3 egg yolks
1/8 tsp salt
1/8 tsp ground red pepper
2 Tbsp lemon juice
½ c butter, cut into pieces
Whisk egg yolks, salt and red pepper in top of a double boiler; gradually add lemon juice, stirring constantly. Add about one-third of the butter to the egg mixture; cook over hot, not boiling, water, stirring constantly with a wire whisk until butter melts. Add another third of the butter, stirring constantly. As sauce begins to thicken, keep adding pieces of butter, whisking constantly until smooth. Serve immediately.
Buttermilk Biscuits
4 cups all-purpose flour
1 tablespoon salt
1 tablespoon baking powder
2 teaspoons baking soda
1 cup Crisco, cold, cut into 1/2-inch pieces
1 1/2 to 2 cups buttermilk, plus additional for brushing
Preheat the oven to 375.
Sift together the flour, salt, baking powder, and baking soda. Cut in the shortening using a pastry blender or your hands until the mixture resembles coarse crumbs. Make a well in the center and add 1 cup buttermilk. Using your hands, quickly fold the dry ingredients into the buttermilk until a sticky dough forms. You may need to add more buttermilk.
Turn the dough out onto a floured surface. Gently fold the dough over itself 3 or 4 times to create layers. Press the dough out to 1 1/2-inches thick and cut with a floured 3-inch biscuit cutter. Lay the biscuits on an ungreased cookie sheet and brush the tops with buttermilk. Bake for 20 to 25 minutes until risen and golden brown.
Subscribe to:
Posts (Atom)
